This section shows a number of helpful tutorials that will guide you through how to use specific features in the PDF Index Generator program!
1. Introduction
What is PDF Index Generator?
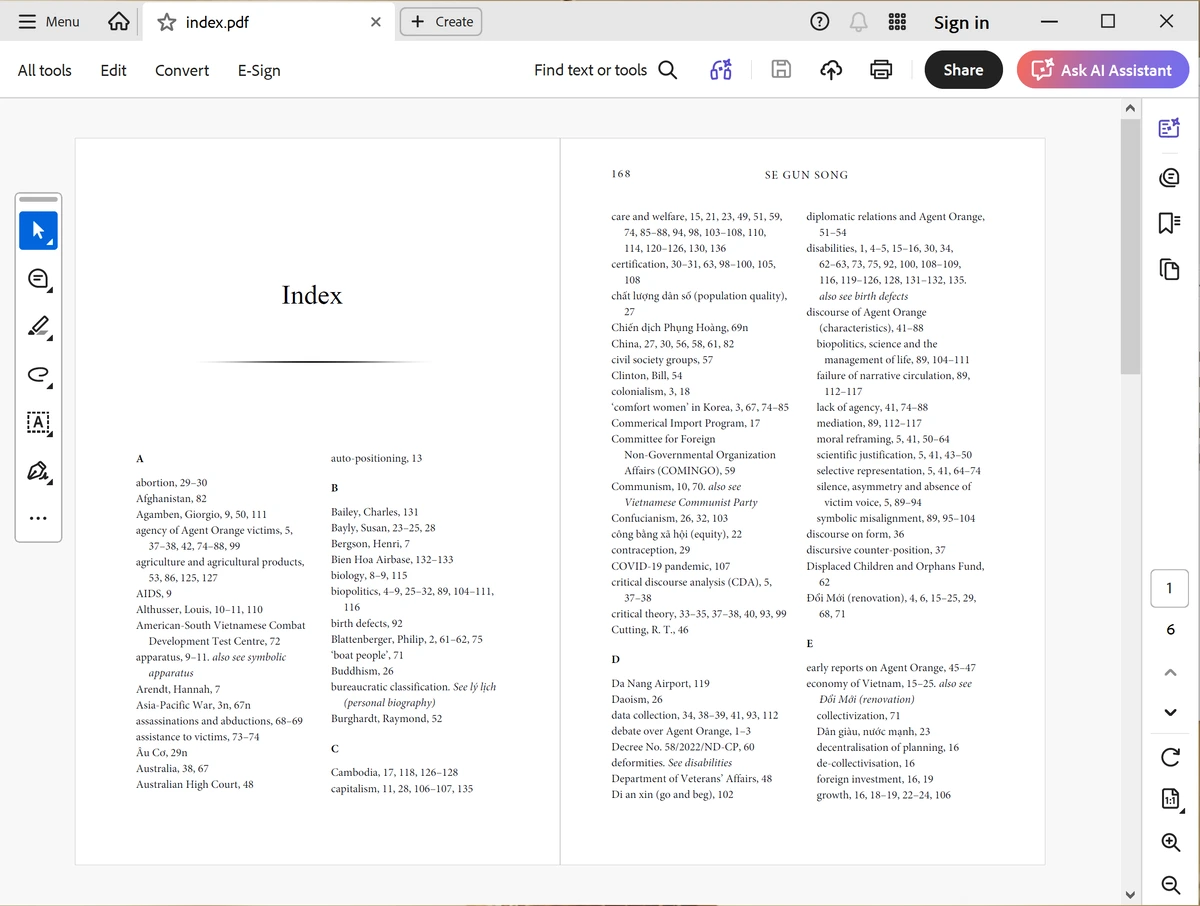 Click to enlarge
PDF Index sample created by
Click to enlarge
PDF Index sample created byPDF Index Generator
PDF Index Generator helps you create a professional index for your PDF book. An index is the list of topics and page numbers you see at the end of most books. It helps readers quickly find what they’re looking for.
A good index can make readers buy your book. A bad one can make them ignore it. That’s why we made PDF Index Generator – to help you create a clear, organized index faster and easier.
Two ways to index your book:
- Classic Mode: You control everything. You decide which terms to include or exclude. Great when you already know exactly what you want in your index.
- AI Mode: Let AI read your book and suggest index terms automatically. Saves you hours of reading time. Uses AI credits (pay-per-page).
Both modes guide you through 4 simple steps to create and write your index. Then you can choose a stylish template to match your book’s design.
You can also run the program from the command line to index multiple books at once. Perfect for publishers or anyone with many books to index.
2. Best Practices for Using PDF Index Generator
Two Powerful Ways to Create Your Index
PDF Index Generator offers you two main approaches to create professional book indexes. Choose the method that best fits your needs:
Full control over every term. You decide exactly what goes into your index. Perfect when you already know which terms you want.
Best for: Specific requirements, controlled vocabulary, multi-word phrases, and when you have a predefined term list.
Processing: Local on your computer (works offline) • Cost: Included with the software (no extra charges).
Learn more about Classic Mode →In Classic Mode, the best practice is to use Include Categories:
- Read your book – Go through your book and copy all important terms, phrases, and names you want in the index. Save them in a text file.
- Define your Include list – Open PDF Index Generator and create one or more Include categories. Paste your collected terms (each on a separate line). Set headers and sub-headers using the Tab key to indent words.
- Index your book – In Step 2, select “Index specific words in the book” and enable your Include category. Click “Generate Index”.
- Review and refine – In Step 3, you can edit, add, or remove terms, and organize your index professionally.
Let AI do the heavy lifting. Artificial Intelligence reads your entire book and automatically suggests the most relevant index terms.
Best for: Comprehensive coverage, saving days of manual work, discovering terms you might miss, and large books.
Processing: Cloud-based (requires internet) • Cost: Uses AI credits (pay-per-page). New customers get 5,000 free credits.
Explore AI Indexing →AI Mode offers three smart ways to index your book:
Zero configuration required. Just enable AI Mode, click “Generate Index”, and let AI analyze your entire book. It will suggest all relevant index terms automatically.
Use it when: You want comprehensive coverage with minimal effort. Perfect for most books.
Time saved: Hours or days of manual reading and term collection.
Learn more about Automatic Mode → Automatic Mode
Click to watch video
Automatic Mode
Click to watch video
Focus AI on specific topics. Tell AI to look for only certain types of terms, like “Person names,” “Medical terms,” or “Historical figures.”
Use it when: Your book is specialized and you only want to index specific categories of information.
Example: Enable “Person names” only to create a names index.
Learn more about Subjects Mode →The best of both worlds. Combine your term lists with AI intelligence. Provide your own list of terms (just like Classic Mode), and AI will intelligently find them along with their variants throughout your book.
Use it when: You already have a term list but want AI to handle variant matching automatically.
Example: Include “Barack Obama” → AI finds “Barack H. Obama,” “Obama, Barack,” and “President Obama” automatically.
Processing: Cloud-based (requires internet) • Cost: Uses AI credits.
Learn more about Categories Mode →3. Defining a list of terms (Include category) to write inside the Index
What is an Include Category?
If you are using Classic Mode with Include Categories (as explained in the previous tutorial), you need to define your own list of terms. This list tells the program exactly which words and phrases to look for in your book.
An Include Category is simply a named group of terms. You can create multiple categories for different topics or sections of your book. This gives you full control over your index.
How to Create an Include Category
Follow these steps to define your own list of terms:
Importing Categories from Files
If you already have a list of terms in a text file, you can import it directly into the program.
Video Tutorials
Learn how to create and use Include Categories to index specific terms in your book.
 Include Categories
Click to watch video
Include Categories
Click to watch video
Learn how to use Include Categories to collect and index all person names from your book.
Learn how to import your pre-existing term lists into PDF Index Generator.
 Import Terms
Click to watch video
Import Terms
Click to watch video
4. Defining a list of terms to force skipping them (Exclude category) while indexing the book
What is an Exclude Category?
Just like Include Categories, Exclude Categories help you control your index. But instead of telling the program what to include, you tell it what to skip.
This is very useful for removing common words that don’t belong in a book index, like:
- Verbs (is, was, are)
- Conjunctions (and, but, or)
- Prepositions (in, on, at)
- Articles (the, a, an)
- Filler words that add no value to the index
How to Create an Exclude Category
Follow these steps to define your own list of terms to skip:
 Click to enlarge
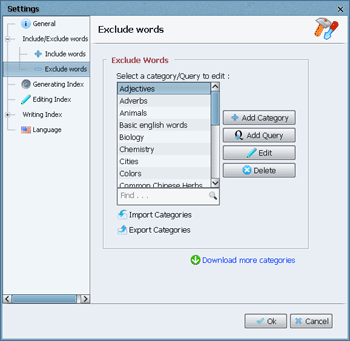
Include/Exclude words dialog
Click to enlarge
Include/Exclude words dialog
-
Open the Exclude Words settings
In PDF Index Generator, go to Tools → Settings → Include/Exclude Words → Exclude words. -
Add a new category
Click the Add Category button to create a new exclude list. -
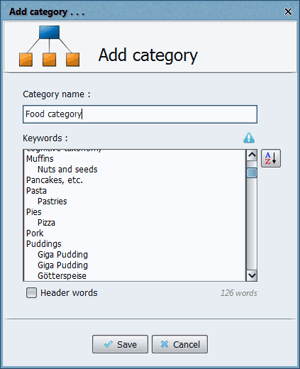
Name your category
Give it a meaningful name (e.g., “Common English Words,” “Stop Words”).
 Click to enlarge
Add a new category
Click to enlarge
Add a new category
-
Enter terms to exclude
Type each word or phrase you want to skip, one per line. -
Save your category
Click Save to store your category, then OK to apply the settings.
Importing Exclude Categories from Files
If you already have a list of terms to exclude in a text file, you can import it directly.
 Click to enlarge
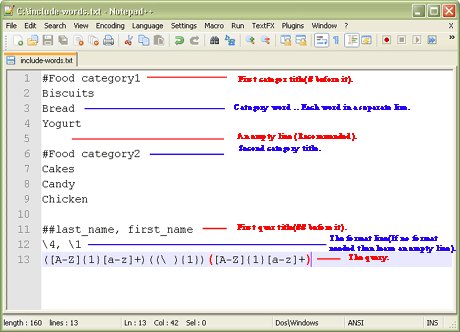
Import from TXT file
Click to enlarge
Import from TXT file
Import from a .txt file:
- Create a text file with your terms (one per line).
- Use #CategoryName to define category names.
- Save with UTF-8 encoding for non-English characters.
- In the program, go to Exclude words → click Import categories.
- Select your file and import it.
 Click to enlarge
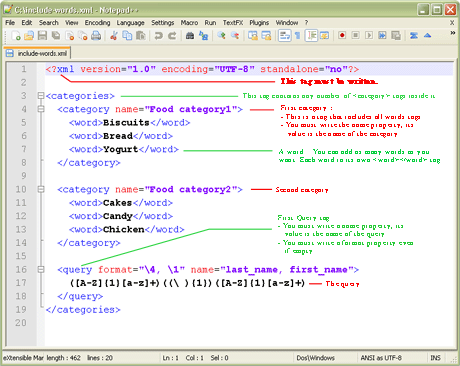
Import from XML file
Click to enlarge
Import from XML file
Import from an .xml file (advanced):
- For users comfortable with XML format.
- Follow the XML structure shown in the example.
- Import the same way as .txt files.
5. Include and Exclude Queries
What is a Query?
A Query is an advanced feature that helps you index or exclude words that follow a specific pattern. Instead of listing every single word in a category, you define a pattern once, and the program finds all matching words automatically.
When to use Queries: When you have many words that share the same format. For example:
- Product codes: E12-39710b, E54-99812k, E98-71003e
- Email addresses: [email protected], [email protected]
- Phone numbers: 562-751-2102, 562-756-2233
- Person names: William Shakespeare, Albert Einstein
How to Create a Query
Follow these steps to define your own query:
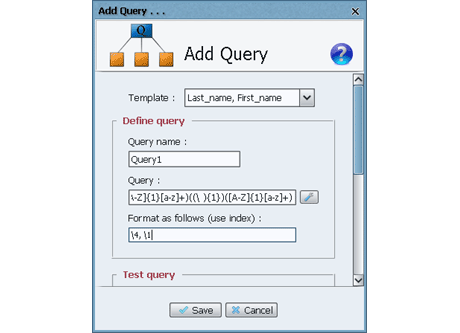 Click to enlarge
Add a new Query
Click to enlarge
Add a new Query
Go to Tools → Settings → Include/Exclude Words. Choose Include words (to index) or Exclude words (to skip), then click Add Query.
Give it a descriptive name like “Email addresses” or “Names query”.
You have two ways to create the pattern:
- Advanced way: Write directly using regular expressions. Learn regex basics here →
- Simple way: Use the Query Generator Tool (recommended for beginners).
Example: Indexing Person Names
Let’s create a query that finds names like “William Shakespeare” and formats them as “Shakespeare, William” in the index.
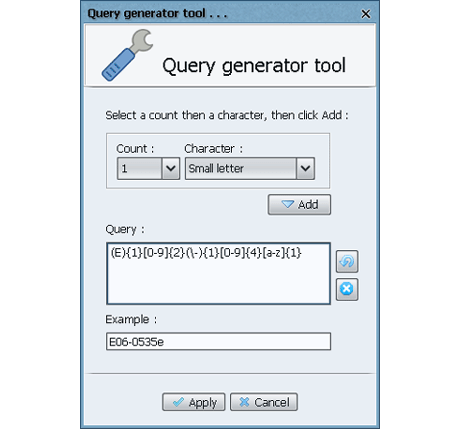 Click to enlarge
Query Generator Tool
Click to enlarge
Query Generator Tool
In the Add Query dialog, click the Query generator tool button.
We want to match “Capital letter + small letters + space + Capital letter + small letters”:
- Count: 1 | Character: Capital letter → Click Add
- Count: n | Character: Small letter → Click Add
- Count: 1 | Character: Specific character… → Type a space → Click Add
- Count: 1 | Character: Capital letter → Click Add
- Count: n | Character: Small letter → Click Add
Apply: Click Apply to use the generated pattern in the Add Query dialog.
Format: In the Format field, type: \4, \1
What does this mean? Each set of parentheses in the pattern has a number.
For the pattern ([A-Z]{1}[a-z]+)((\ ){1})([A-Z]{1}[a-z]+):
- \1 = First name (e.g., William)
- \2 = The space
- \3 = The space (inside parentheses)
- \4 = Last name (e.g., Shakespeare)
So \4, \1 means: Last name, First name → “Shakespeare, William”
Test: Enter sample text like “William Shakespeare was an English poet.” in the Paragraph field, click Test, and see the results.
Save: Click Save to save your query. In Step 2, enable it under Include words and generate your index.
Video Tutorial
Learn how to use Include Queries to index terms with specific patterns using regular expressions.
 Include Queries
Click to watch video
Include Queries
Click to watch video
6. Editing the Generated Index (Step 3)
After generating your index in Step 2, you’ll see all the index results in Step 3. This is where you review, edit, and refine your index before writing it to your book.
Step 3 is the most powerful part of PDF Index Generator. It gives you complete control over every single entry in your index.
Video Tutorial
This comprehensive tutorial covers the entire Step 3 editing process in detail.
 Step-by-Step Guide
Click to watch video
Step-by-Step Guide
Click to watch video
Key Features of Step 3
Here are the main tools you’ll use to edit your index:
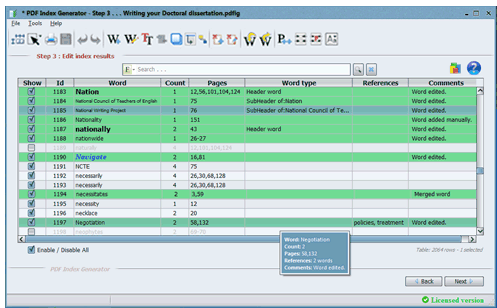 Click to enlarge
Step 3 results table
Click to enlarge
Step 3 results table
Each word has a checkbox in the first column:
- Checked (enabled): The word will appear in the final index.
- Unchecked (disabled): The word will be skipped.
You can also:
- Select multiple rows and right-click to enable or disable them all at once.
- Use the Select/Deselect All checkbox below the table to toggle all visible words.
 Click to enlarge
Edit word dialog
Click to enlarge
Edit word dialog
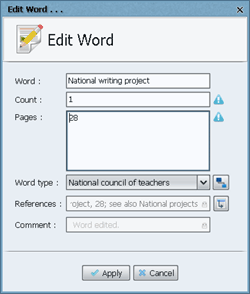
Double-click any word (or right-click and select “Edit”) to open the Edit Word dialog.
You can modify:
- Word title – Change how it appears in the index.
- Word count – Number of times found in the book.
- Page numbers – Use comma-separated values (e.g.,
2,7-9,15) or0for no pages. - Word type – Normal, Header, Sub-Header, Sub-Sub-Header, or Sub-Sub-Sub-Header.
- Cross-references – Add “see” or “see also” references.
After editing, the word row turns green to show it was modified.
Right-click anywhere in the table and select “Add word” to manually add a new entry to your index.
You must specify:
- Word title
- Word count
- Page numbers
- Word type
- Cross-references (optional)
Added words also appear in green.
 Click to enlarge
Edit word font
Click to enlarge
Edit word font
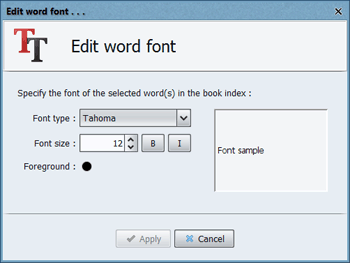
Highlight one or more words and click the Edit Word Font button on the toolbar.
You can change:
- Font type (e.g., Arial, Times New Roman)
- Font size
- Font color
- Bold or Italic styling
Changes are immediately visible in the results table.
 Click to enlarge
Merge words dialog
Click to enlarge
Merge words dialog
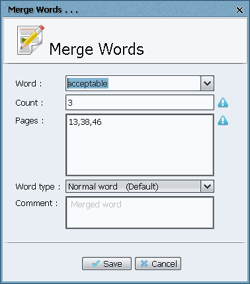
Select 2 or more rows, right-click, and choose “Merge words.” This combines them into a single entry.
You can:
- Choose which word becomes the final title or type a new one.
- Page numbers are automatically merged.
- The word type is set to “Normal” by default (you can change it).
Select one or more rows and click the Duplicate Words button on the toolbar.
This creates a copy of the selected words with the same title, count, pages, and type.
Useful for setting the same word as a Sub-Header under multiple Header words.
You can undo or redo up to 10 actions (increased from 3 in version 3.0).
This gives you confidence to experiment with edits without fear of losing work.
 Click to enlarge
Ignore words
Click to enlarge
Ignore words
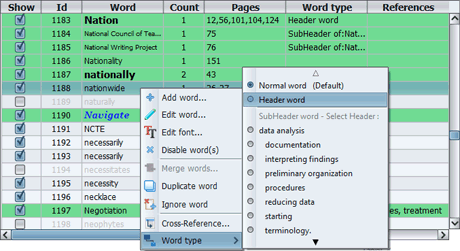
Right-click any selected words and choose Ignore Words to add them to the Ignore list.
These words will be automatically excluded in all future indexing projects.
You can edit the Ignore list anytime from Tools → Settings → Include/Exclude Words → Exclude Words and select the “Ignore list” category.
 Click to enlarge
Define cross-references
Click to enlarge
Define cross-references
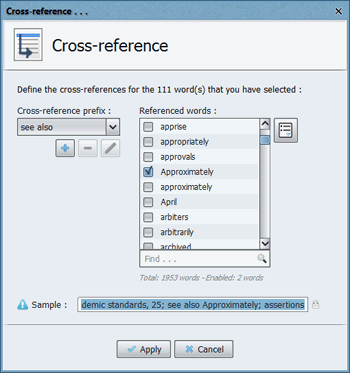
Cross-references help readers find related topics. Common prefixes:
- “see also” – Guides readers to related index entries.
- “see” – Redirects readers to a different entry.
- Other prefixes: “and see”, “see above”, “see below”, “see under”.
Example: Physicians, 12-14, 121; see also Hospitals; Medical schools
 Click to enlarge
Export words dialog
Click to enlarge
Export words dialog
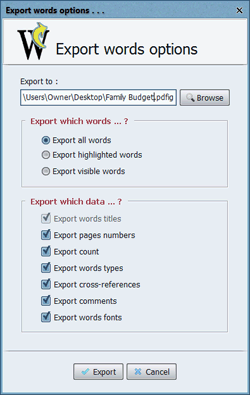
Export Words: Save all or selected words to an external file (.txt or .pdfig).
- Useful for reusing terms in other projects.
- Export options include page numbers, count, word types, and more.
Import Words: Load words from an external file back into your project.
- If duplicates exist, you can choose to merge or ignore them.
 Click to enlarge
Increment/Decrement page numbers
Click to enlarge
Increment/Decrement page numbers
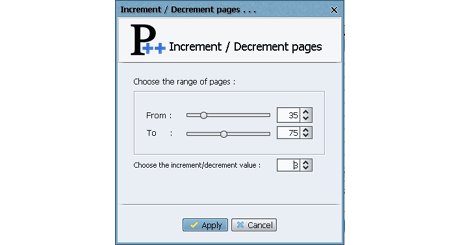
Adjust page numbers for selected rows by a specific value.
Use this when: You add or remove pages from your book after generating the index.
Example: If you insert 5 blank pages at the beginning, increment all page numbers by 5.
Note: Negative page numbers are not allowed. They will be set to 0.
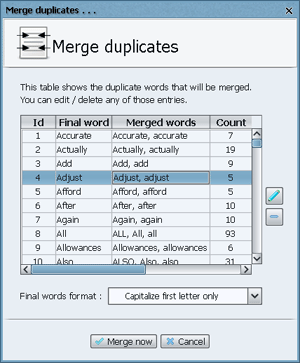 Click to enlarge
Merge duplicates dialog
Click to enlarge
Merge duplicates dialog
Automatically merge words that differ only in capitalization (e.g., “Allowances” and “allowances”).
You can:
- Edit suggested final words.
- Delete entries you don’t want to merge.
- Choose formatting options: lowercase, uppercase, capitalize first letter, or title case.
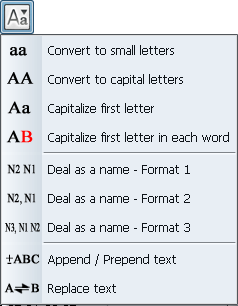 Click to enlarge
Format words menu
Click to enlarge
Format words menu
Apply formatting to selected words:
- Convert to small letters – e.g., “Business” → “business”
- Convert to capital letters – e.g., “business” → “BUSINESS”
- Capitalize first letter – e.g., “business” → “Business”
- Capitalize each word – e.g., “business management” → “Business Management”
- Reverse Person Name – e.g., “Albert Einstein” → “Einstein, Albert”
- Restore Person Name – e.g., “Einstein, Albert” → “Albert Einstein”
- Append / Prepend text – Add text before or after selected words.
- Replace text – Find and replace text within selected words.
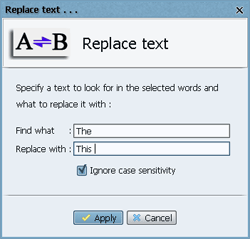 Click to enlarge
Replace text
Click to enlarge
Replace text
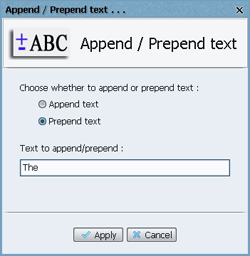 Click to enlarge
Append/Prepend text
Click to enlarge
Append/Prepend text
Use the Search field above the table to quickly find specific words.
- Type the text and press Enter or click the Search button.
- Click Reset to clear the search and show all results again.
- Use wildcards like
A*to find all words starting with “A”.
 Click to enlarge
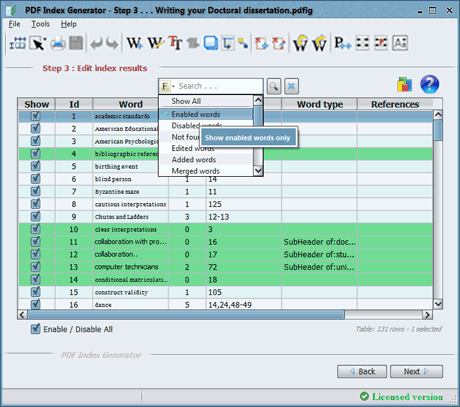
Filter results menu
Click to enlarge
Filter results menu
Click the F button beside the search field to filter the table:
- Show All – Default, shows everything.
- Enabled words – Only words that will appear in the index.
- Disabled words – Only words that are turned off.
- Not found words – Words from Include categories that weren’t found in the book.
- Edited words – Words you’ve modified.
- Added words – Words you’ve manually added.
- Merged words – Words resulting from merge operations.
- Normal words – Only standard entries.
- Header words – Only top-level headers.
- Sub-Header words – Only indented entries.
- By page number – Words found on specific pages.
- By word count – Words found a specific number of times.
- By number of letters – Words with specific character counts.
- By include category – Words from a specific Include category.
- By header word – Sub-Headers under a specific Header word.
- By cross-references – Words with cross-references.
Tip: Combine filters with search for powerful filtering.
 Click to enlarge
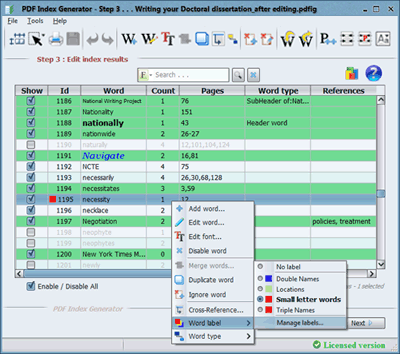
Word labels menu
Click to enlarge
Word labels menu
Assign colored labels to words in the “Id” column to group them for later editing.
Why use labels? Instead of repeatedly selecting the same words, label them once and filter by label to make batch changes quickly.
Manage labels by right-clicking any word and selecting Word label → Manage labels…
7. Header and Sub-Header Words
What are Headers and Sub-Headers?
In a professional book index, some terms are main topics (Headers) and others are sub-topics (Sub-Headers) that appear indented underneath them.
Example:
PDF Index Generator supports 4 levels of hierarchy:
- Level 1: Header word (no indentation)
- Level 2: Sub-Header (1 tab)
- Level 3: Sub-Sub-Header (2 tabs)
- Level 4: Sub-Sub-Sub-Header (3 tabs)
Video Tutorial
This tutorial covers defining headers and sub-headers using the Include Categories feature.
Include Categories
Click to watch video
Method 1: Define Headers in Include Category
When you create an Include Category, you can use the Tab key to indent words and create a hierarchy.
Click to enlarge
Add a new category
Go to Tools → Settings → Include/Exclude Words → Include words.
Click Add Category or edit an existing one.
Type your words and use the Tab key to indent sub-headers:
Result in Step 3:
- “Muffins” → Appears as a Header word
- “Nuts and seeds” → Appears as a Sub-Header under “Muffins”
- “Pork” → Appears as a Normal word (no indentation)
Method 2: Define Headers in Step 3
After generating your index, you can set word types directly in the Step 3 results table.
Click to enlarge
Edit word dialog
Double-click any word (or right-click and select Edit).
In the Edit Word dialog, select the Word type from the dropdown menu.
Available types:
- Normal word – No indentation (default)
- Header word – Top-level, can have sub-headers
- Sub-Header word – Indented under a Header
- Sub-Sub-Header word – Indented under a Sub-Header
- Sub-Sub-Sub-Header word – Indented under a Sub-Sub-Header
 Click to enlarge
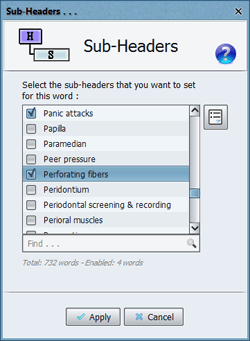
Sub-Headers dialog
Click to enlarge
Sub-Headers dialog
If you set a word to Header, Sub-Header, or Sub-Sub-Header, the Sub-Headers button becomes enabled.
Click it to specify which words should appear as sub-entries under the current word.
Note: This button is not available for Normal or Sub-Sub-Sub-Header words (they cannot have sub-headers).
Click to enlarge
Right-click menu
Select one or more rows in the results table, right-click, and choose Word type.
From the sub-menu, select the word type you want to apply.
The menu shows all available Header words that can have sub-headers.
Customizing Fonts for Headers and Sub-Headers
 Click to enlarge
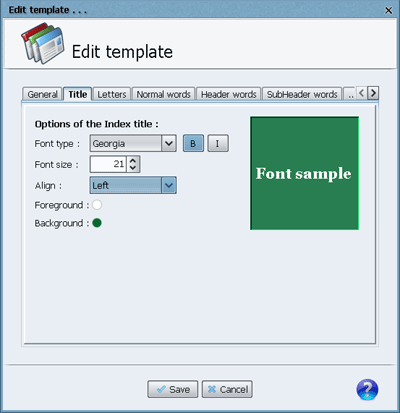
Edit index template
Click to enlarge
Edit index template
You can customize the font for Normal, Header, and Sub-Header words:
- Go to Tools → Settings → Writing Index → Index templates
- Select a template and click Edit
- In the template editor, you can set different fonts, sizes, and colors for each word type
This gives your final index a professional, polished look.
8. Writing the Final Index to a file (Step 4)
Step 4 is the final step where you write your index to your book. You can append it to an existing PDF, create a new PDF, or save it as a text file.
Before writing, you can customize how your index looks using Writing Options and Select Template.
Video Tutorial
Learn how to customize your index’s appearance using the Index Templates feature.
 Index Templates
Click to watch video
Index Templates
Click to watch video
Step 4 Overview
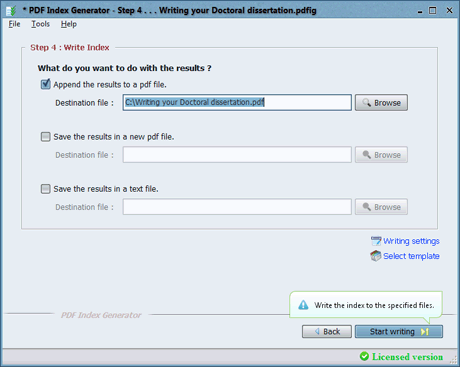 Click to enlarge
Step 4 interface
Click to enlarge
Step 4 interface
In Step 4, you can choose where to write your index:
- Append to existing PDF – Adds the index to your book’s PDF file
- Create new PDF – Creates a standalone PDF with just the index
- Write to text file – Saves the index as a .txt file
- Write to Word document – Saves the index as .docx or .doc (available in version 3.4+)
Customizing Your Index
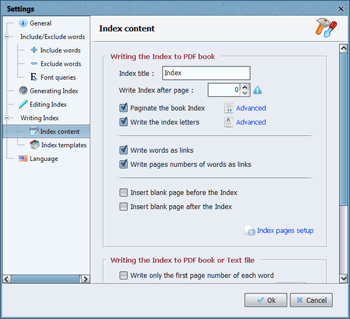 Click to enlarge
Writing options
Click to enlarge
Writing options
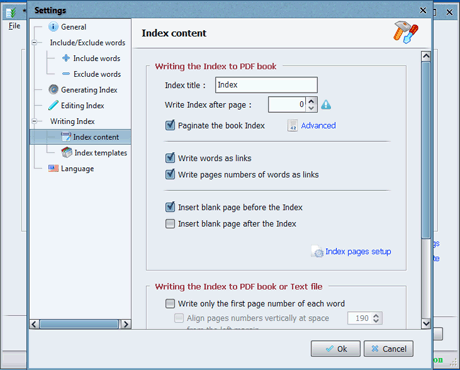
Click Writing Options to open the Index content settings. Here you can:
- Index Title – Set a custom title (e.g., “Appendix” or “Index”)
- Write Index After Page – Choose where to insert the index in your PDF
- Links – Make index words and/or page numbers clickable links
- Blank Pages – Insert blank pages before and/or after the index
- Page Setup – Set page dimensions and orientation (A4, A5, custom)
- Page Numbers – Choose to show all pages or just the first occurrence
- Header Words – Show page numbers for header words
- Word Count – Show how many times each word appears
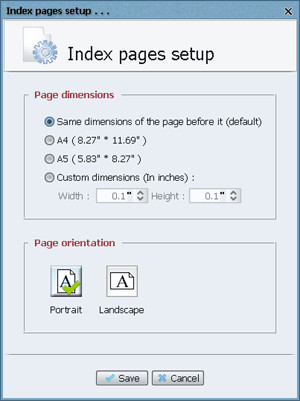 Click to enlarge
Page setup
Click to enlarge
Page setup
Click Index pages setup to control the physical appearance of your index pages:
- Paper Size – Choose A4, A5, or custom dimensions
- Orientation – Portrait or Landscape
- By default, the program matches the size of the page before the index
Index Templates
 Click to enlarge
Select template
Click to enlarge
Select template
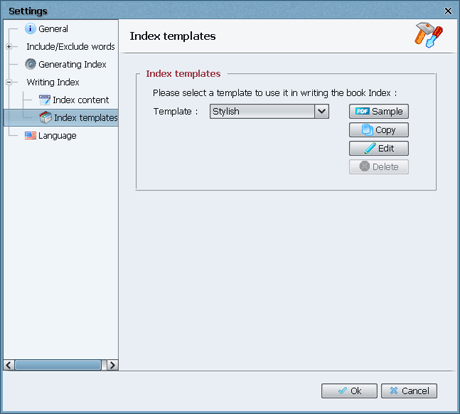
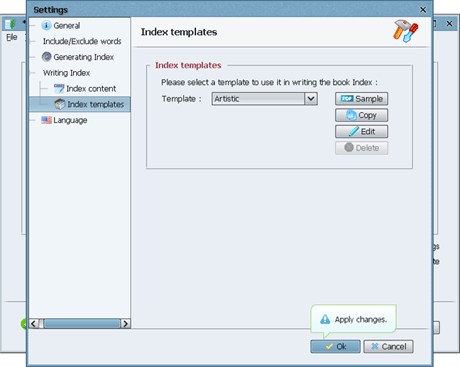
Click Select Template to choose from pre-designed styles.
Available templates: Classic, Stylish, Artistic, Business, and more.
Click the Sample button to preview how a template looks before using it.
Click to enlarge
Edit template
- Edit – Modify a template’s fonts, colors, and margins
- Copy – Duplicate a template to create your own custom style
- Delete – Remove custom templates (default templates cannot be deleted)
Best practice: Copy a template first, then edit the copy. This preserves the original.
What You Can Customize in a Template
After setting your options and choosing a template:
- Click Start Writing to generate your index
- A progress bar shows the writing status
- When complete, a success message appears
- Your index is now ready!
Note: If writing takes too long, a timeout warning may appear. You can adjust the timeout in program settings.
9. Writing Index Entries as Links
What are Index Links?
Index links make your book index interactive. When readers click on an index entry or its page number, they jump directly to that page in the PDF. This is a great way to improve the reader experience.
Two Types of Links
Each index term becomes a clickable link that takes the reader to the first page where that term appears in the book.
Example: Clicking on “Shakespeare, William” in the index takes you directly to the page where William Shakespeare is first mentioned.
Each page number in the index becomes a clickable link that takes the reader directly to that specific page.
Example: Clicking on “23” in “Shakespeare, William, 12, 23, 45” takes you to page 23.
How to Enable Index Links
 Click to enlarge
Index content settings
Click to enlarge
Index content settings
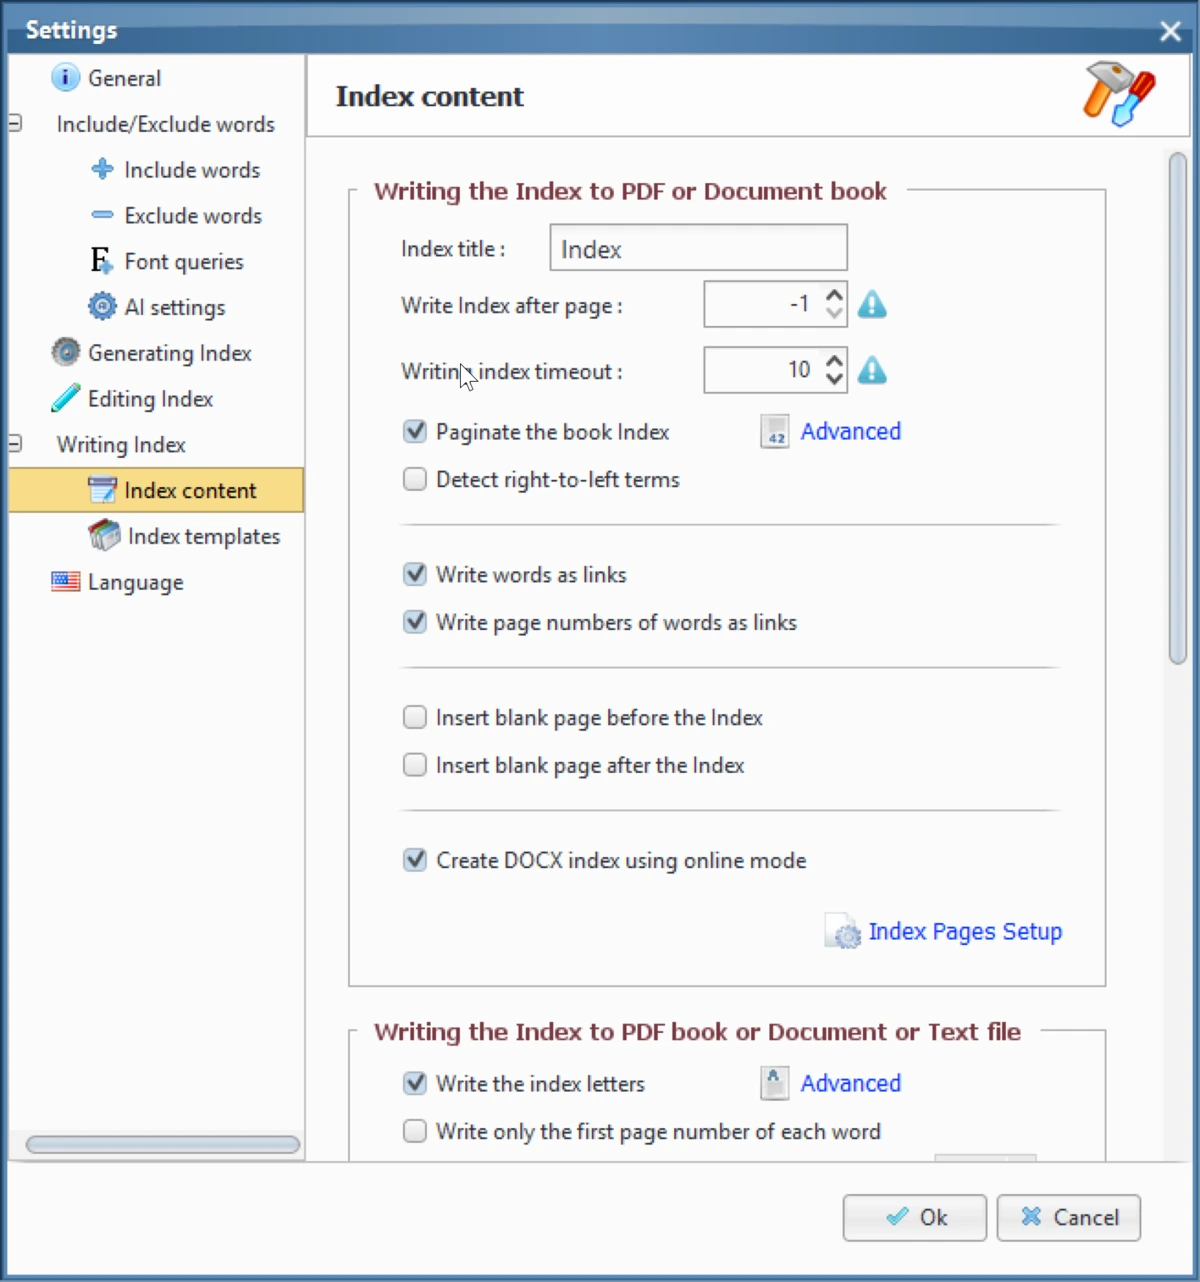
Go to Tools → Settings → Writing Index → Index content.
In the Index content tab, you’ll find two link options.
- ✓ Write words as links – Makes each index term clickable.
- ✓ Write page numbers as links – Makes each page number clickable.
Enable one or both options based on your preference.
After enabling the link options:
- Go to Step 4 in the program.
- Select a PDF to append the index to.
- Click Start Writing.
- Note: Creating links is slower than regular writing. Be patient for large indexes.
- When complete, open the PDF and test the links.
Summary
✅ Benefits of Index Links:
- Readers find topics instantly
- Better user experience for digital books
- Makes your book look more professional
- Works in Adobe Reader, Mac Preview, and other PDF readers
10. Case Sensitivity (Small/Capital Letters)
What is Case Sensitivity?
By default, PDF Index Generator treats “market” and “Market” as two different words. This is called being case sensitive – capital letters and small letters are treated differently.
This means you might see duplicate entries like “car” and “Car” in your Step 3 results table.
How to Disable Case Sensitivity
 Click to enlarge
Case sensitivity settings
Click to enlarge
Case sensitivity settings
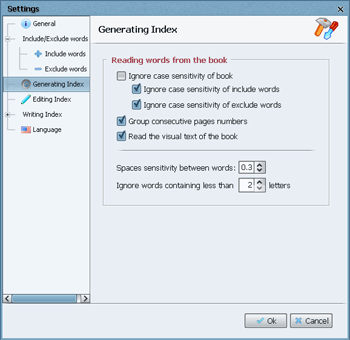
Go to Tools → Settings → Generating Index.
Check the option Ignore case sensitivity of book.
This tells the program to treat all words as lowercase for matching purposes.
Case Sensitivity for Include and Exclude Categories
You can also control case sensitivity specifically for your Include and Exclude categories.
In the same settings window, you’ll find:
- Ignore case sensitivity of include words – When enabled, your Include category terms will match regardless of capitalization.
- Ignore case sensitivity of exclude words – When enabled, your Exclude category terms will be skipped regardless of capitalization.
Example: If you exclude “car”, both “car” and “Car” will be excluded.
11. Create a Custom Index Template
What is an Index Template?
An Index Template controls how your final index looks – its layout, colors, fonts, and spacing. PDF Index Generator comes with several pre-designed templates, and you can create your own custom templates to match your book’s style.
This tutorial shows you how to customize templates to get the perfect look for your index.
What You Can Customize
Step-by-Step Customization
 Click to enlarge
Index templates settings
Click to enlarge
Index templates settings
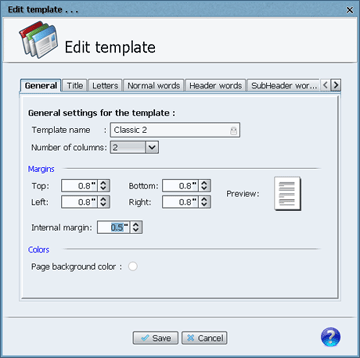
Go to Tools → Settings → Writing Index → Index templates.
You’ll see a list of available templates.
- Copy – Creates a duplicate you can rename and customize.
- Edit – Directly modifies the selected template.
- Delete – Removes custom templates (cannot delete default templates).
Best practice: Click Copy to create your own template, then edit the copy.
In the General tab, find the Number of columns option.
- 2 columns – Best for most books (balanced readability and space)
- 1 column – Easier to read but uses more pages
- 3-5 columns – Saves space but can be harder to read
Change the value and click Save.
In the General tab, you can adjust:
- Top margin – Space at the top of the page
- Bottom margin – Space at the bottom
- Left margin – Space on the left side
- Right margin – Space on the right side
- Internal margin – Space between columns
The template editor has separate tabs for each element:
- Title – Index title font, size, color, alignment
- Letters – A, B, C… letters font, size, color
- Normal words – Standard entries font, size, color
- Header words – Header entries font, size, color
- SubHeader words – Sub-header entries font, size, color
- Cross references – “See also” text font, size, color
- Page numbers – Page numbers font, size, color
- Paginator – Page numbering at the bottom
Each tab lets you set the font type, size, color, and style (bold, italic).
Click to enlarge
Index content settings
First, enable pagination in Tools → Settings → Index content:
- Check Paginate the book Index
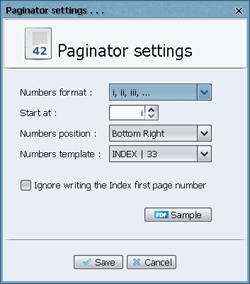
- Click Advanced to open paginator settings
 Click to enlarge
Paginator settings
Click to enlarge
Paginator settings
You can customize:
- Numbers format – Arabic numbers (1, 2, 3), Roman numerals (i, ii, iii), or letters (a, b, c)
- Start At – Which number to start with (e.g., start at 13 makes first page page 13)
- Numbers position – Where to place page numbers: Top/Bottom, Left/Center/Right
- Numbers template – Custom format like “INDEX | 33” (33 is replaced with the actual number)
- Ignore first page number – Hides the page number on the first index page (useful for a cleaner look)
Click Sample to preview your settings before saving.
Click to enlarge
Page setup
In Tools → Settings → Index content, click Index pages setup:
- Paper size – Choose A4, A5, or custom dimensions (in inches)
- Orientation – Portrait (vertical) or Landscape (horizontal)
By default, the program matches the page size of the book page before the index.
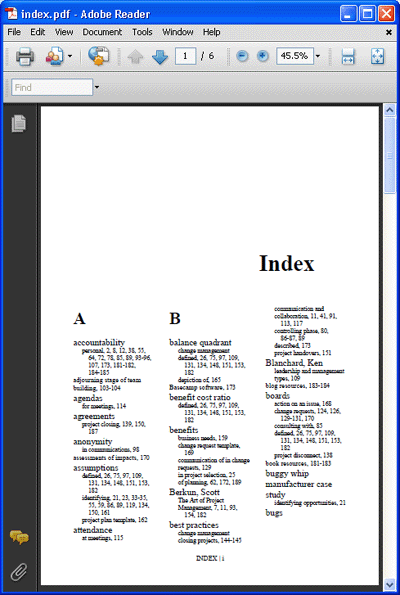
Example: Creating a Custom Template
Here’s what we did to create a custom template:
- Selected the Classic 3 template
- Set 3 columns per page
- Set margins: Top 0.8, Bottom 1.0, Left 0.8, Right 0.8, Internal 0.4 inches
- Enabled paginator: Format i, ii, iii, Start at i, Position Bottom Center
- Template: “INDEX | 33”
- Page dimensions: A4 size
 Click to enlarge
Custom template sample
Click to enlarge
Custom template sample
12. Step-by-Step: Indexing a Book
Practical Example: “Writing Your Doctoral Dissertation”
This tutorial walks you through the complete process of indexing a real book using PDF Index Generator. We’ll use a book called “Writing Your Doctoral Dissertation” as our example.
Video Tutorial
This comprehensive video covers the entire indexing process from start to finish.
Step-by-Step Guide
Click to watch video
Step 1: Collect Your Terms
Read through your book and copy all important terms, phrases, and names you want in the index. Save them in a text file.
Eisenhart
hoops
independence
doctoral programs
collaboration with professors
stages
terminology
statistical significance
dance
relevant interpretations
data sources
gardening
funding
term papers
logical interpretations
conditional matriculation status
running a marathon
clear interpretations
Ramon Veal Seminar
Chutes and Ladders
topical note cards
libraries
hurdles
National Writing Project
Byzantine maze
self-discipline
qualitative analysis
hypothesis-testing studies
home relationships
quality control
computer technicians
topic selection
university security
dissertation committees
data analysis
starting
terminology.
interpreting findings
reducing data
preliminary organization
procedures
documentation
working environment
cautious interpretations
American Educational Research Association
permanent matriculation status
feasibility studies
external readers
National Council of Teachers of English
professional organizations
journey
personal qualities
writing style
security personnel
New York Times Magazine
dissertation phase
trip
University of Pennsylvania Ethnography Conference
part-time students
birthing event
outside readers
productive mind-set
International Conference on Teacher Research
bibliographic reference cards
dissertation orals
implications
originality
funding proposals
teacher conversation groups
Dissertations Abstract International
mountain climbing
quantitative analysis
Harvard University
train ride
data collection
theory-building
transcribing
American Psychological Association
war
visual displays of information
student-colleagues
terminology..
collaboration..
support groups..
librarians
blind person
dissertation proposal
gate-keeping
data
academic standards
Fahrenthold
game
goal-directed
Rudenstine
marathon
maze
video-tapes
university community
computer technicians
libraries
security
running the rapids
personal crises
doctoral committees
theoretical rationale
construct validity
Ethnologue
inferences
rapids
pilot testing
examination phase
theory-testing
dissertation proposals
research
literature reviews
unpredictability
Indented terms are sub-headers.
Step 2: Configure Step 1
 Click to enlarge
Step 1 interface
Click to enlarge
Step 1 interface
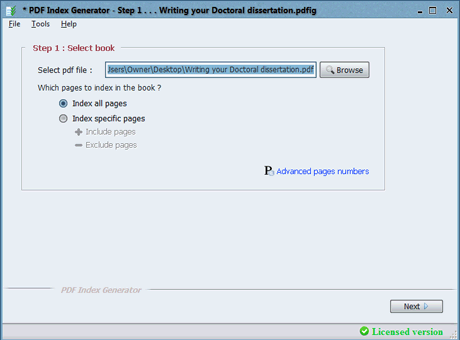
- Browse and select your PDF book.
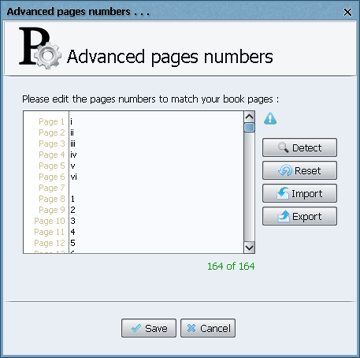
- Click Advanced page numbers to set page numbers.
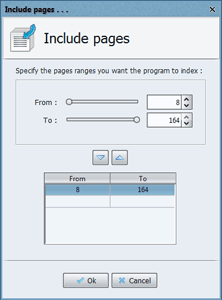
- Our book has 164 pages: pages 1-6 are Roman numerals (i, ii, iii, iv, v, vi), page 7 is blank, and pages 8-164 are Arabic numbers (1-157).
 Click to enlarge
Advanced page numbers
Click to enlarge
Advanced page numbers
- Enable Index specific pages and select pages 8-164 to skip the introductory pages.
 Click to enlarge
Include pages
Click to enlarge
Include pages
 Click to enlarge
Define include category
Click to enlarge
Define include category
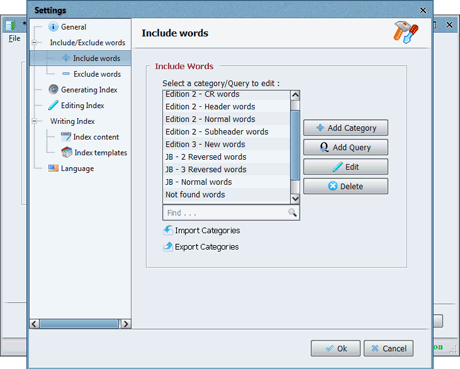
- Go to Tools → Settings → Include/Exclude Words → Include words.
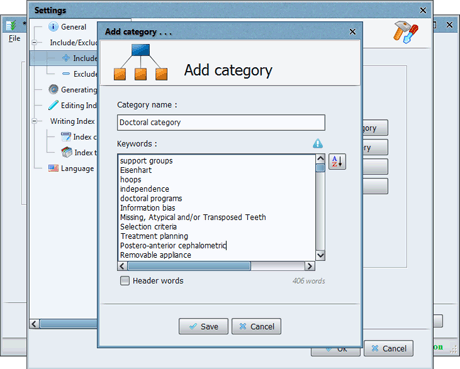
- Click Add Category and name it “Doctoral category”.
- Paste all your collected terms in the Keywords field, each on a separate line.
- Click Save.
 Click to enlarge
Add category
Click to enlarge
Add category
 Click to enlarge
Add query
Click to enlarge
Add query
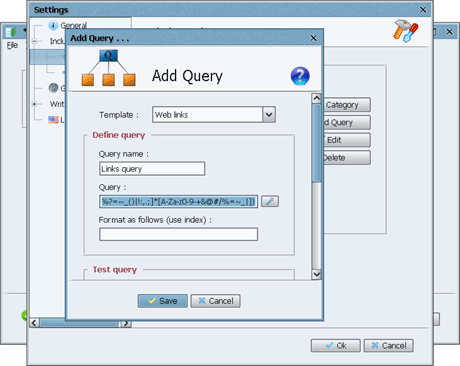
- Go to Tools → Settings → Include/Exclude Words → Include words.
- Click Add Query and name it “Links query”.
- From the Template dropdown, select “Web links”.
- Click Save and then Ok.
- Press Next to go to Step 2.
Step 3: Configure Step 2
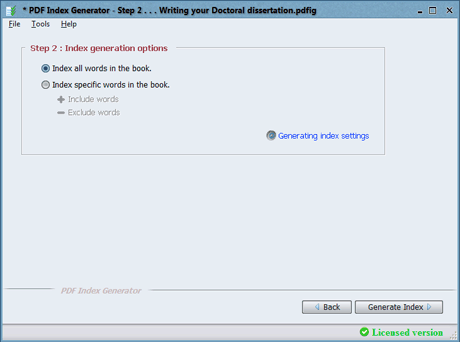 Click to enlarge
Step 2 interface
Click to enlarge
Step 2 interface
- Enable Index specific words in the book.
- Click Include words and enable “Doctoral category” and “Links query”.
- Click Exclude words and enable common word categories like Adjectives, Adverbs, etc.
- Click Generating index settings and set Ignore words containing less than 3 letters.
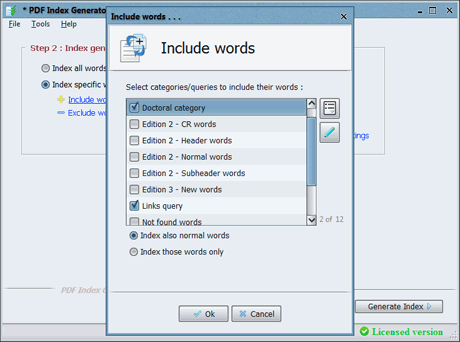 Click to enlarge
Include words
Click to enlarge
Include words
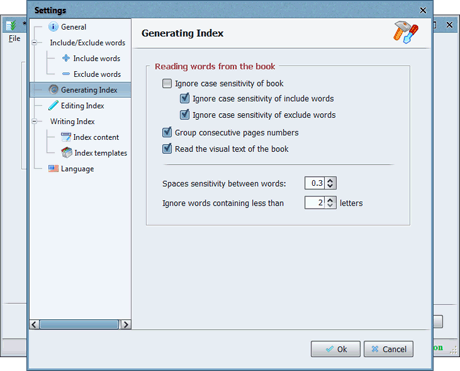 Click to enlarge
Generating settings
Click to enlarge
Generating settings
- Click Generate Index. This takes about 1 minute.
- When complete, click Done to go to Step 3.
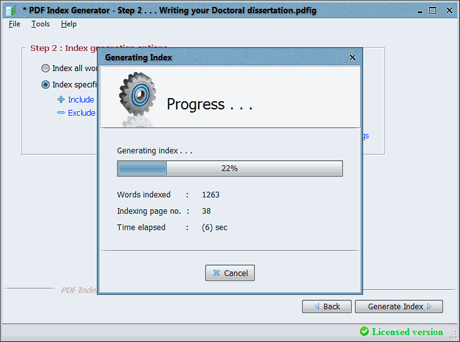 Click to enlarge
Generating index
Click to enlarge
Generating index
Step 4: Edit in Step 3
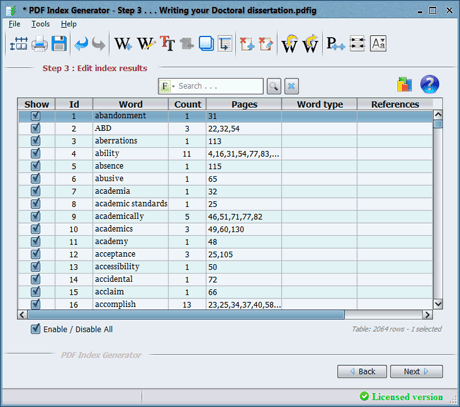 Click to enlarge
Step 3 results
Click to enlarge
Step 3 results
- The table shows 2064 words. Disable Select/Deselect All to disable everything.
- Click Filter → By include category → select “Doctoral category”.
- Now only 115 words from your list are shown. Enable them all.
- Click Filter → Show All to see everything again.
- Search for www. to find web links from the query. Enable the 3 found links.
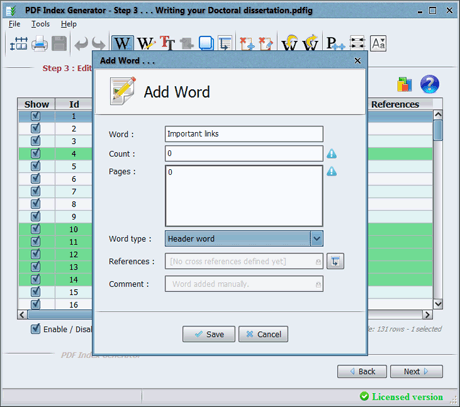 Click to enlarge
Add word
Click to enlarge
Add word
- Click Add word to add a new header: “Important links” (Count: 0, Pages: 0, Type: Header word).
- Select the 3 links, right-click → Word type → “Important links” to make them sub-headers.
- Click Reset to clear the search.
- Set word types for any other headers and sub-headers as needed.
- Press Next to go to Step 4.
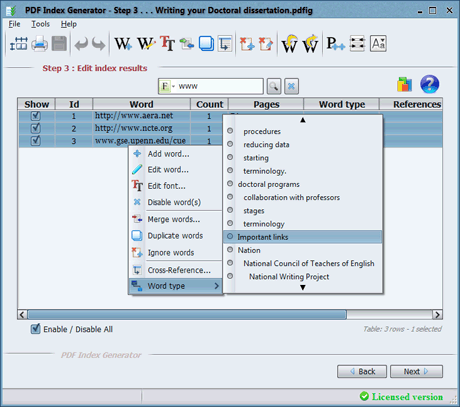 Click to enlarge
Set sub-headers
Click to enlarge
Set sub-headers
Step 5: Write the Index
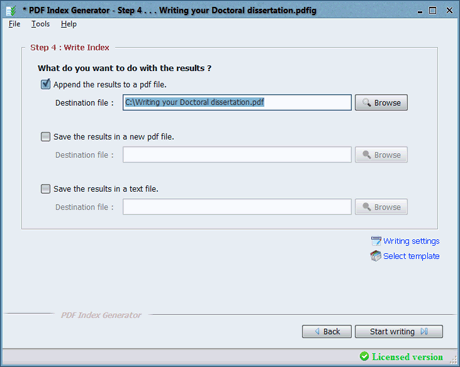 Click to enlarge
Step 4 interface
Click to enlarge
Step 4 interface
- Click Writing settings and set:
- Index title: Appendix
- Write page numbers as links: Enabled
- Write page numbers of Header words: Enabled
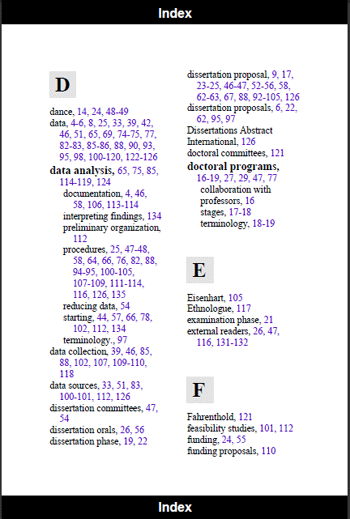
- Click Select template and choose the Artistic template.
- Click Start Writing to append the index to your book.
- When complete, save your project and exit.
 Click to enlarge
Writing settings
Click to enlarge
Writing settings
 Click to enlarge
Select template
Click to enlarge
Select template
 Click to enlarge
Final index sample
Click to enlarge
Final index sample
13. Indexing a Book Using Font Queries
What are Font Queries?
Font Queries let you index words or phrases based on their visual appearance in the PDF. Instead of listing specific words, you tell the program: “Index only text that is bold” or “Index only italic text in red color.”
This is especially useful when key terms in your book are consistently formatted. For example:
- Technical manuals – Bold terms are often important definitions
- Academic papers – Foreign terms are italicized
- Legal documents – Defined terms are underlined or bolded
Video Tutorial
Learn how to use Font Queries to index terms based on their formatting in your book.
Font Queries
Click to watch video
How Font Queries Work
 Click to enlarge
Step 2 – Font queries option
Click to enlarge
Step 2 – Font queries option
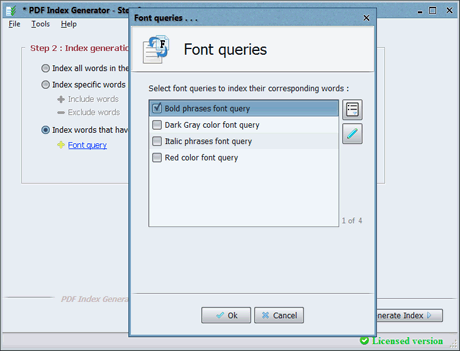
In Step 2, enable the option “Index words that have specific font format”.
Then click the Font query link to configure your font rules.
You can combine multiple attributes in a single query. For example, index only bold AND italic text, or 14pt AND blue text.
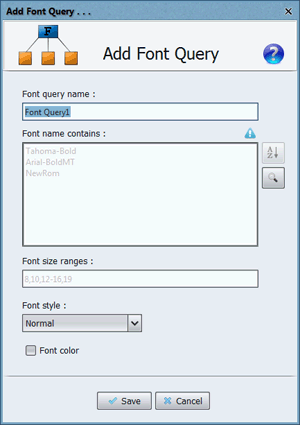 Click to enlarge
Add font query dialog
Click to enlarge
Add font query dialog
Click Add Font Query to create a new font rule.
Specify the font attributes you want to match, give it a name, and click Save.
You can create as many font queries as you need.
Important: AND vs. OR Logic
If you set: Font size = 12 AND Font style = Bold
Result: Only text that is both 12pt and bold will be indexed.
If you want: Text that is 12pt OR Bold
Solution: Create two separate font queries:
- Query 1: Font size = 12
- Query 2: Font style = Bold
Enable both queries – the program will index all text matching either condition.
This gives you maximum flexibility to capture exactly what you need.
Practical Examples
Scenario: In a technical manual, all important terms are in bold text.
Solution: Create a font query with:
- Font Weight = Bold
Result: The program captures only bold terms from your book.
Scenario: In an academic paper, foreign terms are written in italic.
Solution: Create a font query with:
- Font Style = Italic
Result: Words like Schadenfreude, Weltschmerz, and Zeitgeist are indexed automatically.
Scenario: Section headings in your book are 18pt and bold.
Solution: Create one font query with:
- Font Size = 18
- Font Weight = Bold
Result: Only 18pt bold text (headings) is indexed.
14. Indexing multiple books through the Command Line Mode
What is Command Line Mode?
Command Line Mode lets you run PDF Index Generator from the terminal or command prompt without using the graphical interface. This is perfect for:
- Batch processing – Index dozens or hundreds of books at once
- Automation – Use with scripts for repetitive tasks
- Servers – Run on headless systems without a GUI
Video Tutorial
Learn how to use PDF Index Generator from the command line for batch processing and automation.
 Command Line Mode
Click to watch video
Command Line Mode
Click to watch video
How It Works
Install PDF Index Generator normally. On Windows, the default installation path is:
- Windows: Start Menu → Command Prompt or PowerShell
- macOS: Applications → Utilities → Terminal
- Linux: Terminal from your applications menu
Use the cd command to go to the installation directory:
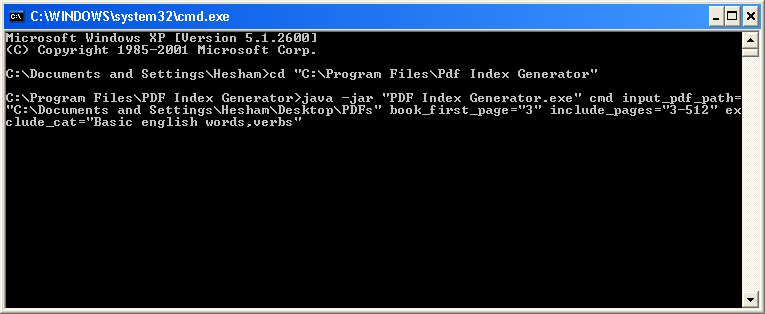 Click to enlarge
Command Line screenshot
Click to enlarge
Command Line screenshot
The basic command format is:
The cmd parameter is mandatory – it tells the program to run in Command Line Mode.
Key Parameters
i,ii,iii,,1,2,3).
all, even, odd, or specific ranges like 1,15,53-68.
12,60-63,82).
yes to index only the words from Include categories.
yes to group consecutive pages (e.g., 1-6 instead of 1,2,3,4,5,6).
Stylish, Artistic).
yes to print a detailed report in the console.
Example: Indexing a Folder of PDFs
This command indexes a folder of PDFs, indexing only odd pages, excluding specific categories, and using the Stylish template:
- Reads every PDF in the specified folder
- Calculates the final pages to index (odd pages only)
- Generates the index, excluding all specified categories
- Appends the index to each PDF using the Stylish template
- Prints a detailed report in the console
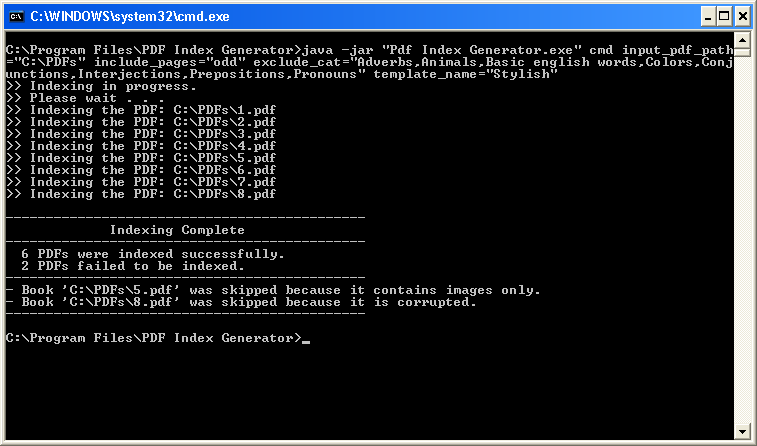 Click to enlarge
Command Line Indexing Report
Click to enlarge
Command Line Indexing Report
Using a Configuration File
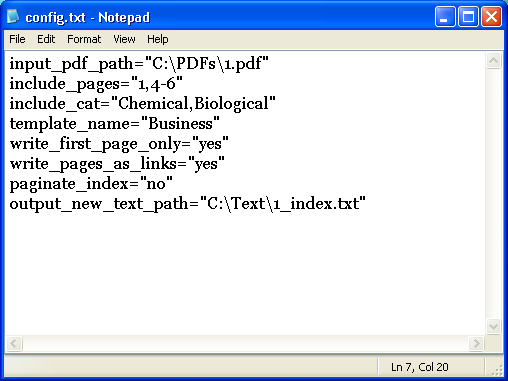 Click to enlarge
Configuration file sample
Click to enlarge
Configuration file sample
Instead of typing many parameters in the command line, create a text file with all parameters (one per line).
Config file example:
Then run:
Note: The cmd parameter must be in the command line, not in the config file.
Important Notes
-Xmx1024m to allocate more memory for faster processing:
java -Xmx1024m -jar "PDF Index Generator.exe" cmd ...


