This section shows a number of helpful tutorials that will guide you through how to use specific features in the PDF Index Generator program!
1. Introduction
What is PDF Index Generator ?
PDF Index Generator is a powerful utility that you can use to create a back-of-book for your PDF book. If you look at the end of any book, you will find an Index that helps readers find any subject they are looking for inside the book simply and in seconds. This index may attract the reader to buy the book or ignore it depending on the subjects written in it, and the way of presenting it. So you must give it good care to appear simple and professional at the same time.
That is why we have created PDF Index Generator. This program will not totally create the Index without any interaction from you, but you will have to do some effort, and PDF Index Generator will make your interaction less by helping you create and write this Index faster, more organized(In 4 easy steps), and simply write it to your book with a nice stylish template you select.
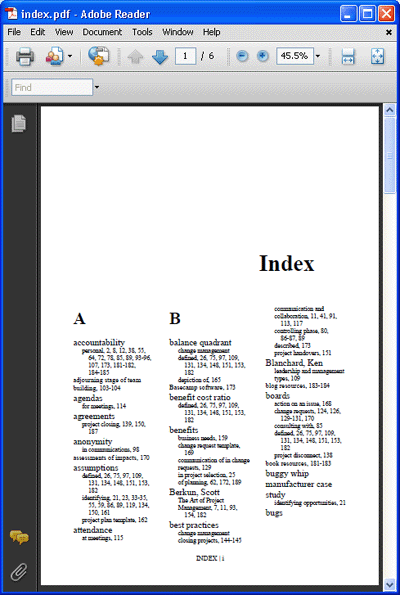
You can check the sample above to see how your final Index will look like in the book.

2. Best practices of using PDF Index Generator
These are briefed practices to show you how to use PDF Index Generator the best way, and
the detailed steps will come later:

- Read your book, copy all terms and phrases you want to see in the book Index, and save them in a text file.
- Open PDF Index Generator and define your own list of terms (Include category) to force indexing them. Paste the collected terms in this list, each term in a separate line. Set header & sub-header words using tab indentation in the include list.
- Index your book using this include list.
- In step 3 edit the terms if you want this.
- Select a template design suitable for your Index.
- Write the final Index to your PDF file.

3. Defining a list of terms to write in the Index
As specified in the Best practices of using PDF Index Generator above it is preferred to
define your own list of terms(Include list) to force indexing them then write them
in your book. And we suggest that you make each group of words related
to each other grouped under the same Category or Query. There are 4 ways to define this list of
terms(Include list) :

-
Defining the list(category) of words manually :
- The Category is useful if you will write all the words/phrases to index manually. You can write any phrases containing more than 1 word, apostrophes, quotations, hyphens, and anything you can think of, like “Orthole’s river”, “Daily e-book”, … etc.
- Run the program and Choose :
Tools->Settings->Include/Exclude Words->Include words. - Click Add Category to add a new category of words.
- Specify the category name. Make it meaningful to what the words refer to.
- Write any words/phrases you want to index, each in a new line, then click Save.
- If you want to define Header & Sub-Header words you can do that while definning the new category by writing indented words(Using the Tab key on your keyboard), as it appears in the screenshot beside. If you use this category then in Step3 you will see all those words appear having words types corresponding to their indentation automatically in the results table.
- Click Save to apply the settings.
- Please check the 2 screenshots beside to see the Include words dialogs.
-
Defining a new Query :
- The Query is useful if you have a group of words you want to index having the same format, so instead of writing all those
words in a Category list, it is better to define a Query that matches them all.
- Run the program and Choose :
Tools->Settings->Include/Exclude Words->Include words. - Click Add Query to add a new Query.
- Specify the query name. Make it meaningful to what the query matches.
- Define your Query, then click Save.
- Click Ok to apply the settings.
- Please check the 2 screenshots beside to see the Query related dialogs.
- The Query is an advanced topic, so we will show you more explaination and some examples in the topic Include/Exclude Query example.
- The Query is useful if you have a group of words you want to index having the same format, so instead of writing all those
words in a Category list, it is better to define a Query that matches them all.
-
Importing a *.txt file :
- Create a *.txt file, define your categories inside it, and define the group of words under each category. The file must have specifications like it appears in the screenshot beside(Those specifications are also explained in details in the program help). If you did not follow those specifications, the file may fail to be imported inside the program.
- Note: If the *.txt file will contain non-english words, we advise you to encode the file to UTF-8 before importing it inside the program.
- Run the program and Choose :
Tools->Settings->Include/Exclude Words->Include words. - Click Import categories and choose your *.txt file to import it. You should see a confirmation message that the categories file is imported fine. If it failed, then please review it and be sure it follows all the specifications then re-import it again.
- Click Ok to apply the settings.
-
Importing an *.xml file :
- This method is for advanced users who know how to deal with XML files.
- Create an *.xml file and define your categories inside it, and define the group of words under each category. The file must have specifications like it appears in the screenshot beside. If you did not follow those specifications, the file may fail to be imported inside the program.
- Run the program and Choose :
Tools->Settings->Include/Exclude Words->Include words. - Click Import categories and choose your *.xml file to import it. You should see a confirmation message that the categories file is imported fine. If it failed, then please review it and be sure it follows all the specifications then re-import it again.
- Click Ok to apply the settings.

4. Defining a list of terms to force skipping them while indexing the book
Just like in the above point of defining an Include list of words. Defining an Exclude list of words
is very useful and will help you skip indexing the most common words that exist in most books, and
no need to insert them in the Index like Verbs, Conjunctions, … The program comes with a big list
of most common English words to Exclude them. There are also categories of words in other languages like French
and German. You can download them from here then import them inside the program.
In addition to this you can define your own list of terms(Exclude list) to force skipping them while indexing the book.
And we suggest that you make each group of words related to each other grouped under the same Category or Query.
There are 4 ways to define this list of terms(Exclude list) :

-
Defining the list of words manually :
- The Category is useful if you want to exclude specific words/phrases containing more than 1 word, apostrophes, quotations, hyphens, and anything you can think of, like “Orthole’s river”, “Daily e-book”, … etc.
- Run the program and Choose :
Tools->Settings->Include/Exclude Words->Exclude words. - Click Add Category to add a new category of words.
- Specify the category name. Make it meaningful to what the words refer to.
- Write any words/phrases you want to skip index, each in a separate line, then click Save.
- Click Ok to apply the settings.
- Please check the 2 screenshots beside to see the Exclude words dialogs.
-
Defining a new Query :
- The Query is useful if you have a group of words you want to exclude having the same format, so instead of writing all those
words in a Category list, it is better to define a Query that matches them all.
- Run the program and Choose :
Tools->Settings->Include/Exclude Words->Exclude words. - Click Add Query to add a new Query.
- Specify the query name. Make it meaningful to what the query matches.
- Define your Query, then click Save.
- Click Ok to apply the settings.
- Please check the 2 screenshots beside to see the Query related dialogs.
- The Query is an advanced topic, so we will show you more explaination and some examples in the topic Include/Exclude Query example.
- The Query is useful if you have a group of words you want to exclude having the same format, so instead of writing all those
words in a Category list, it is better to define a Query that matches them all.
-
Importing a *.txt file :
- Create a *.txt file, define your categories inside it, and define the group of words under each category. The file must have specifications like it appears in the screenshot beside(Those specifications are also explained in details in the program help). If you did not follow those specifications, the file may fail to be imported inside the program.
- Note: If the *.txt file will contain non-english words, we advise you to encode the file to UTF-8 before importing it inside the program.
- Run the program and Choose :
Tools->Settings->Include/Exclude Words->Exclude words. - Click Import categories and choose your *.txt file to import it. You should see a confirmation message that the categories file is imported fine. If it failed, then please review it and be sure it follows all the specifications then re-import it again.
- Click Ok to apply the settings.
-
Importing an *.xml file :
- This method is for advanced users who know how to deal with XML files.
- Create an *.xml file and define your categories inside it, and define the group of words under each category. The file must have specifications like it appears in the screenshot beside. If you did not follow those specifications, the file may fail to be imported inside the program.
- Run the program and Choose :
Tools->Settings->Include/Exclude Words->Exclude words. - Click Import categories and choose your *.xml file to import it. You should see a confirmation message that the categories file is imported fine. If it failed, then please review it and be sure it follows all the specifications then re-import it again.
- Click Ok to apply the settings.

5. Include/Exclude Query example
-
A Query is useful if you have a group of words you want to include/exclude from your book, having the same format, so instead of writing all those
words in a Category list, it is better to define a Query that matches them all.
-
Examples of words having the same format :
-
E12-39710b, E54-99812k, E98-71003e
Format: (1)E + (2)Digits + (1)- + (5)Digits + (1)small letter. -
[email protected], [email protected], [email protected]
Format: Any email address. -
562-751-2102, 562-756-2233, 562-744-5629
Format: (3)Digits + (1)- + (3)Digits + (1)- + (4)Digits.
-
E12-39710b, E54-99812k, E98-71003e
-
You can define a new Query from Tools->Settings->Include/Exclude Words. Choose the Include words tab or Exclude words tab and
click Add Query to add a new Query.
-
The program comes with a number of predefined Query templates that are useful to catch some famous terms having the same format, like links, emails, … etc.
We will explain an example to show you how to define your own Query :
Example : Index any names in the book like “William Shakespeare” and write them in the Index like “Shakespeare, William” :- To do this we will define a Query to index all words from the book that start with (A capital letter + A number of small letters + A space + A capital
letter + A number of small letters). This will catch words like “William Shakespeare”, “Ishaq Newton”, … etc. Then we will format the indexed words
to write them in the Index as (Second word + Comma + A space + First word). So they will appear like this in the index: “Shakespeare, William”, “Newton, Ishaq”, … etc.
-
Run the program and Choose :
Tools->Settings->Include/Exclude Words->Include words.
- Click Add Query to add a new Query. The Add Query dialog will appear.
- Specify a suitable query name, like: Human names query.
- We should now write the Query in the query field. There are 2 ways to define a query :
- The advanced way: By writing the query directly using regular expressions(A tutorial to guide you through it is Here).
- The simple way: By using the Query generator tool. And we will use that tool as it will just do what we want exactly.
- Click on the Query generator tool button beside the query field. The Query generator tool dialog will appear.
- Select “1” from the “Count” combo + “Capital letter” from “Character” combo, then click “Add” = Look for a word starting with “(1) capital letter”.
- Select “n” from the “Count” combo + “Small letter” from “Character” combo, then click “Add” = Look for a word starting with “1 capital letter” + “Any number of small letters” after it.
- Select “1” from the “Count” combo + “Specific character…” from “Character” combo + Write ” ” in the dialog that will appear = Look for a word starting with “1 capital letter” + “Any number of small letters” after it + “1 Space” after it.
- Select “1” from the “Count” combo + “Capital letter” from “Character” combo, then click “Add” = Look for a word starting with “1 capital letter” + “Any number of small letters” after it + “1 Space” after it + “1 capital letter” after it.
- Select “n” from the “Count” combo + “Small letter” from “Character” combo, then click “Add” = Look for a word starting with “1 capital letter” + “Any number of small letters” after it + “1 Space” after it + “1 capital letter” after it + “Any number of small letters” after it.
- You can see an example field that will automatically generate a word sample this query may grab from a book.
- You can use the button Undo to undo the last character added to this query, or click Clear to clear this query to start it from the begining.
- When you finish creating your query click Apply to use the generated query in the “Add Query” dialog.
-
This query will index words like “William Shakespeare”, and now we want to command the program to format it to appear like this “Shakespeare, William” so in the format field inside the “Add Query” dialog write: \4, \1.
Now what does that mean ?
Every 2 brackes (…) have an index. So if our query is like this: ([A-Z]{1}[a-z]+)((\ ){1})([A-Z]{1}[a-z]+), then :- ([A-Z]{1}[a-z]+) = Bracket number 1 = \1
- ((\ ){1}) = Bracket number 2 = \2
- (\ ) = Bracket number 3 = \3
- ([A-Z]{1}[a-z]+) = Bracket number 4 = \4
Write the last name then write “1 comma” then write “1 space” then write the first name. This will result a word like “Shakespeare, William”.
- You can test this query and its filter by writing a sentence like “William Shakespeare was an English poet and playwright.” in the Paragragh then click Test to see the effect of the query and the filter on this sentence in the Results field, to be sure it works fine.
- When you are done creating your query, click Save to save it.
- Click Ok to apply the settings.
- Start your Index process normally, and in Step2 click the option Index specific words in the book, enable the Include words and select the query named Human names query, then press Ok.
- Generate your index, and notice the results in Step3 … Check the effect of the query on your results.
- Please check the 2 screenshots beside to see the Query related dialogs.
- To do this we will define a Query to index all words from the book that start with (A capital letter + A number of small letters + A space + A capital
letter + A number of small letters). This will catch words like “William Shakespeare”, “Ishaq Newton”, … etc. Then we will format the indexed words
to write them in the Index as (Second word + Comma + A space + First word). So they will appear like this in the index: “Shakespeare, William”, “Newton, Ishaq”, … etc.
-
Note: We understand that the Query is an advanced and complicated topic, so if you have any problems
using it, please contact us and we will guide you through how to use it.

6. Editing the generated Index
We will discuss here what you can do in Step3 of the program to edit the generated index words.

-
Enable/Disable words:
- At the first column of the table there is a checkbox field for each row(word). By enabling this checkbox it means this word will be written in the book index. By disabling it, it means this word will be ignored and not written to the book index.
- You can select a number of rows from the table, right click them and choose Enable words or Disable words. This is helpful if you want to enable or disable a group of words at the same time.
- Below the table there is another check box Select/Deselect All. Enabling it will enable all the rows visible in the table, and disabling it will disable all the words visible in the table.
-
Edit word:
You can double click any row in the table(Or right click it and select “Edit”). The Edit word dialog will appear, which will allow you to edit the following:
- The word title.
- The word count: The number of times it was found in the book.
- The word page numbers: You can write a comma separated page numbers; i.e: 2,7,8,9,15 , or you can use a dash to specify a range of Consecutive page numbers; i.e: 2,7-9,15 (you can write 0 which means no page numbers will be written for this word in the Index).
- The word type: some words can be written indented in the Index if they are defined
as Sub-Headers of other words. Here are the words types available :
- Normal words: This is the default type(Which means it has no Header word above it or Sub-Headers under it, so it will not be indented when it is written in the final index. ).
- Header words: These are the top level words that you define Sub-Headers under them.
- Sub-Header words: These are the indented words that you define under the Header words.
- Sub-Sub-Header words: These are the indented words that you define under the Sub-Header words.
- Sub-Sub-Sub-Header words: These are the indented words that you define under the Sub-Sub-Header words.
The Headers and Sub-Headers is an advanced topic, so we will discuss it in details in the topic Dealing with Header & Sub-Header words. - References: You can see the cross-references defined for this word in the “References” text field. You can click on the “Edit cross-references” button beside it to edit the cross-references defined for this word.
-
Add word:
You can right click anywhere in the results table and select “Add word”. The Add word dialog will appear(It looks exactly like the Edit dialog), which will allow you to add a new word to the table manually. The added word row will appear in Green. When adding a new word you must specify:- The word title.
- The word count.
- The word page numbers.
- The word type.
- The word cross-references.
- Edit word font:
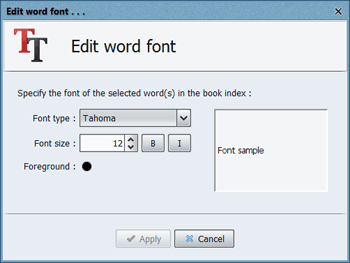
You can edit the font of normal words, header words and sub-header words by editing the index template used from the program settings as explained in the templates section, but if you want to edit the font of one or two words apart from their type then using this feature will help you do that. Just highlight the words you want from Step3 results table, then click the “Edit word font” button found on the tools bar. You should see the “Edit word font” window, and it will allow you to change the font of those words.
Through this window you can change the font type, size, color, and you can set it to bold or italic. When you click the “Apply” button to apply the changes, you can see the font changes applied to the words in the results table.
-
Merge words:
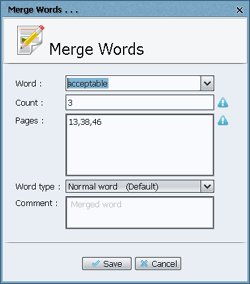
You can select 2 or more rows from the table, right click them and select “Merge words”, where the Merge words dialog will appear(It looks exactly like the Edit dialog), which will allow you to merge the selected words from the results table together into one word. You can choose which word from the merged words will be the final word to use, or you can write a new title. The page numbers will be merged automatically, and you can edit them.
Note: The word type of the merged words will be automatically set to “Normal” but you can choose another type.
-
Duplicate words:
This will allow you to create a copy of the selected words from the results table. Just select one or more rows from the table then click the Duplicate words button on the tools bar to create a copy of those words. You will see new rows for them in the table(Same title, count, pages, and type). This is very useful when you want to set a word as a Sub-Header for more than 1 Header word.
-
Undo-Redo:
This is a new option that will allow you to undo or redo any action you made. You can undo 3 actions and redo 3 actions only because this operation reserves high memory.
-
Add words to the ignore list:
You can use the Exclude categories of words to exclude the non-important words from your book while generating the index, but still there may be other words you see are not important in the results table, so in every project you will have to disable them in the results table. The ignore list will be very helpful in this case. You can right click any selected words in Step3 and select Ignore words to add them to the Ignore list, and they will be excluded automatically while generating an Index in later projects.
The Ignore list is just an exclude category of words, but it is automatically chosen to be excluded when generating the index. You do not have to choose this category yourself like you do with normal word categories. There is a button at the top bar in Step3 that allows you to edit this ignore list, or you can directly open Tools -> Settings -> Include/Exclude words -> Exclude words then select the Ignore list category to edit it.
-
Defining cross-references for a word:
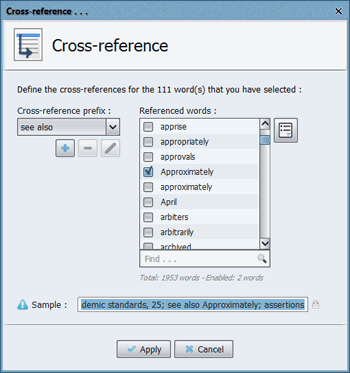
Cross-references are useful to redirect the reader from one word to another. Using cross-references the reader can discover information and other topics related to the current word.
A cross-reference consists of the word + its page numbers + the cross-reference prefix + the referenced words.
Cross-Reference prefixes :
-
“see also” is used to guide the reader to related index words.
i.e. Physicians, 12-14, 121; see also Hospitals; Medical schools
-
“see” is used if you think the reader may be reading the current word by mistake because he is looking for another word so redirect him to it.
i.e. Doctors, 79, 153; see Physicians
- There are many other prefixes available in the program like “and see”, “see above”, “see below” and “see under”.
-
“see also” is used to guide the reader to related index words.
-
Import words/Export words ::
These are 2 buttons found at the top bar in Step3.
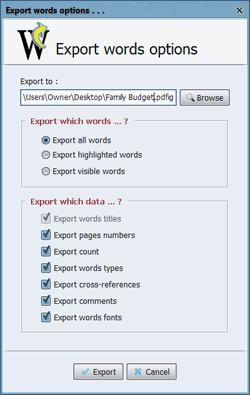
Export words will allow you to export all words in the results table or a group of them to an external file. That is very useful if you want to use those exported words later or import them to another project to merge them together. When you click on this button you will see a dialog to select a file to export the words to. This file can be a text(*.txt) file or a project(*.pdfig) file, then another dialog will appear to set the exporting options. You can :- Edit the path of the exported file and its extension.
- Specify whether to export all the words in the results table or the selected words only from the table.
- Specify which data to export for each word. Exporting the words’ titles is mandatory, but exporting their pages numbers, count, words types, comments are all optional.
Import words will allow you to import words from a text(*.txt) file or a project(*.pdfig) file to the results table. If any of the imported words already exist in the table, you can control whether to merge them together or ignore them.
-
Increment/Decrement page numbers:
This is a button at the top bar in Step3 that allows you to increment or decrement the page numbers of the selected rows in Step3 by a specific value. When this button is clicked it will open a dialog that will allow you to choose a range of pages, and specify a value to Increment/Decrement this range of pages with. This option is useful if you will edit your book again later and add some pages to it, like blank pages between chapters.
Note: If you have specified a decrement value that will cause some page numbers to become negative, then those page numbers will be set to Zero, as negative page numbers are not allowed.
-
Merge duplicates:
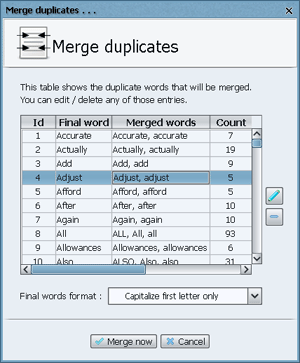
This is a button at the top bar in Step3. If you see many duplicated words (like Allowances, allowances) in the results table then you can click this button to automatically merge them all together. The program will show a dialog listing all the duplicates in the results table, and the suggested final words after merging them(the suggested words are all in small letters by default). You can edit any of those merged words by clicking the edit button or click the Delete button to remove any of them to skip merging their entries. You can also see the combo box at the bottom of the dialog (Final words format). This dialog allows you to format the selected final words from the table in the dialog. You can :
- Convert the selected final words to small letters(Default option).
- Convert the selected final words to capital letters.
- Capitalize the first letter only in the selected final words.
- Capitalize the first letter in each word in the selected final words.
-
Format words:
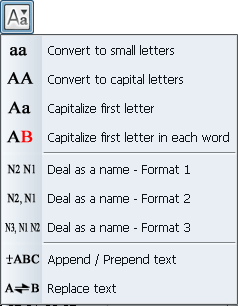
This is a button at the top bar in Step3 that when you click it will show a format menu which will allow you to format the selected words from the results table. You can :- Convert to small letters: Convert the selected words to small letters.
- Convert to capital letters: Convert the selected words to capital letters.
- Capitalize first letter: Convert the first letter only of the selected words to capital letter.
- Capitalize first letter in each word: Convert the first letter only in each word of the selected words to capital letter.
- Deal as a name – Format 1: This option will deal with the selected words as names having 2 parts. It will write the last name then the first name. i.e: Albert Einstein => Einstein Albert
- Deal as a name – Format 2: This option will deal with the selected words as names having 2 parts. It will write the last name then a comma then the first name. i.e: Albert Einstein => Einstein, Albert
- Deal as a name – Format 3: This option will deal with the selected words as names having 3 parts. It will write the last name then a comma then the first name then the second name. i.e: Thomas Alva Edison => Edison, Thomas Alva
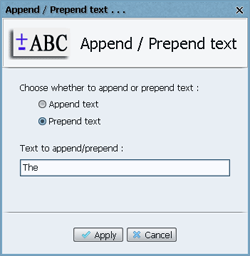
- Append / Prepend text: This will show a dialog which will allow you to append or prepend text to the selected words in the results table.
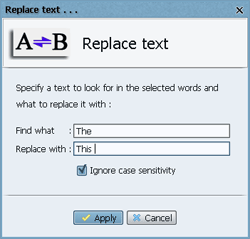
- Replace text: This will show a dialog which will allow you to find text in the selected words in the results table then replace it with other text.
-
Search for any word:
The Search text field above the table will help you search for any words in the table easily. Just type the text you are looking for in the table and press enter or press the Search button. You can click the Reset button to reset the search and show all table results again.
-
Filter table results:
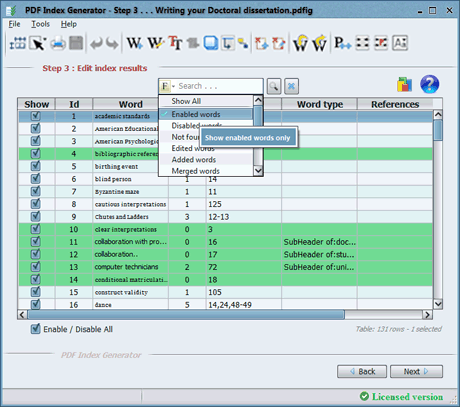
Beside the search field in Step3 you will notice a small button titled F. This button gives you many choices to filter the table results with, making editing the table results very simple. The available choices are :- Show All: (Default)Show all table results.
- Enabled words: Show only the enabled words. These are the rows that appear black colored, and enabled in Column one(Show). They will be written to the final index.
- Disabled words: Show only the disabled words. These are the rows that appear gray colored, and disabled in Column one(Show). These are the rows that you have disabled manually, and they will not be written in the final Index
- Not found words: Show only the words that were not found. These are the rows that appear gray colored, and disabled in Column one(Show). These are the rows that were in the Include categories of words, but were not found in the book, and they will not be written in the final Index.
- Edited words: Show only the words that you have edited.
- Added words: Show only the words that you have added manually to the table.
- Merged words: Show only the merged words in the table.
- Normal words: Show only the words that have a Normal type. Those are the words that are not defined as Header words, or Sub-Headers to any Header words.
- Header words: Show only words that are of type Header words.
- Sub-Header words: Show only words that are of type Sub-Header words. This will get any Sub-Header words and any levels below it(Sub-Sub, Sub-Sub-Sub).
-
By page number:
Show only words that were found in specific page numbers. A dialog will appear so you can write those page numbers(i.e: 12,21-26,114) to show only their corresponding words.
Note: If you would like to filter words that exist in specific page numbers and no other ppage than use braces(…).
i.e:
- 2,21-23,114: This will catch the word: Taxi 2,12,51 because it exists in page 2.
- (2,21-23,114): This will not catch the word: Taxi 2,12,51 because it exists in pages 12,51 which are not in the specified ranges. so using the braces here will catch words found in any or all of the page numbers 2, 21, 22, 23, 114 only. If the word exists in other page numbers than those, then it will be ignored.
- 2,21-23,114: This will catch the word: Taxi 2,12,51 because it exists in page 2.
- By word count: Show only words that were found specific number of times in the book. A dialog will appear so you can write count values(i.e: 112,200-300) to show only their corresponding words.
- By number of letters: Show only words that have a specific number of letters. A dialog will appear so you can write the number of letters values(i.e: 8,10-13,15) to show only their corresponding words.
- By include category: Show only words of a specific Include category. A dialog will appear showing a combo box with all the Include categories that you have chosen in Step2 to include their words. You are allowed to choose one category to show only its corresponding words.
- By header word: Show only words that are Sub-Headers of a Header word. A dialog will appear showing a combo box with all the words that you have set their type to Header words. You are allowed to choose one Header word to show only its corresponding Sub-Header words.
- By cross-references: Show only words that have cross-references. You can use this filter also to show all words referring to a specific word.
Tip: Using the “Filters” with the “Search” would be a nice idea.
-
word labels:
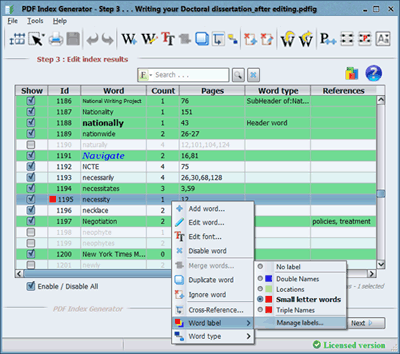
In Step3 results table you can set a colored label to one or more words in the results table. You can see this as shown in the screenshot found beside for the red label placed in the “Id” column beside the word “necessity”. This is useful if you want to mark one or more words to make any changes for them later. For example you can group a number of words together using the word labels feature, so you can make one or more action on those words altogether at once instead of having to highlight each word every time manually to do the same action on it.
Manage word labels: You can define a new label or edit old ones by clicking the “Manage labels…” item in the popup menu.

7. Dealing with Header & Sub-Header words
-
When you create an Index for your book you will mostly need to define some words as children of others, to
be written indented in the Index. In PDF Index Generator we refer to this as Headers and Sub-Header words.
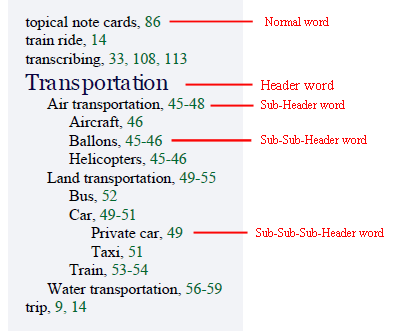
PDF index Generator allows you to define 4 levels of words to write in the book Index. You can check the screenshot
beside to see how these levels of words will look like in the final index.
-
You can define header & sub-header words when defining a new include category or you can set them in Step3 of the program.
-
Defining header & sub-header words in an include category :
When you create a new category you can write indented keywords using the “Tab” button on your keyboard, and the program is smart enough to understand that the indented words are sub-headers for the keywords above them. If you did this then the program will automatically set the words’ types for all the keywords in Step3 just as you have set them here through the indentation.
The program allows 4 levels of words(Header words, sub-header words, sub-sub-header words, and sub-sub-sub-header words) so you can write till three tabs for the keywords here. If you write 4 or 5 tabs for any keyword the program will still consider it as a sub-sub-sub-header word.
For example: In the screenshot found above; the keyword “Muffins” will appear in Step3 results table as a “Header word” and the keyword “Nuts and seeds” will appear as a sub-header for it.
Another example: In the screenshot found above; the keyword “Pork” has no indented keywords written below it, so this keyword will appear in Step3 results table as a “Normal word”.
-
Defining header & sub-header words in Step3:
This can be done through any of the following methods :-
Double click any row in the table(Or right click it and select Edit). The Edit word dialog will appear,
which will allow you to select the word type.
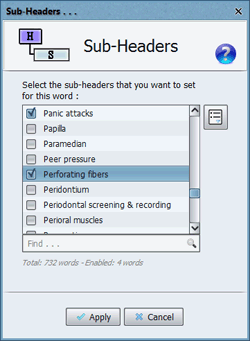
Note: If you have set the word type to a ‘Header word’ or ‘Sub-Header word’ or ‘Sub-Sub-Header word’ then the button found beside the word type selection box will appear enabled. This is the Sub-Headers button. It will allow you to specify all the sub-header words for the current word. It will not become enabled if you have set the word type to a ‘Normal word’ or ‘Sub-Sub-Sub-Header word’ as those types of words cannot have sub-headers for them.
-
Select one or more rows from the results table, select Word type menu, and select the word type you want to use from the Sub-Menu.
You will see the available words types “Normal word”, “Header word” and some words titles that you specified their word type before which
can have Sub-Headers under them, as you can see in the screenshot beside.
-
Double click any row in the table(Or right click it and select Edit). The Edit word dialog will appear,
which will allow you to select the word type.
-
The words types available :
- Normal words: This is the default type(Which means it has no Header word above it or Sub-Headers under it, so it will not be indented when it is written in the final index).
- Header words: These are the top level words that you define Sub-Headers under them.
- Sub-Header words: These are the indented words that you define under the Header words.
- Sub-Sub-Header words: These are the indented words that you define under the Sub-Header words.
- Sub-Sub-Sub-Header words: These are the indented words that you define under the Sub-Sub-Header words.
-
You can specify the font size, font color, font type of Normal words, Header words, and Sub-Header words from :
Tools -> Settings -> Writing Index -> Index templates … Select a template name then click Edit to edit it and specify all the fonts, colors you want to use for those words types.

8. Writing the final Index to a file
-
When you reach the final step of the program(Step 4), the program allows you to append the generated
index to an existing PDF file(After the page you specify), or write the index in a new PDF, or write
the index in a new text file.
-
Before writing your index to the specified files, it is a good idea to specify how you want your index to look like.
In Step4 there are 2 labels that will help you do this Writing Options and Select template.
-
Writing Options: This will open the Settings dialog on the Index content tab. Through this tab you can set the following options for the written index :
- Specify the index header title.
- If you will append your index to an existing PDF you can specify after what page to append it.
- Specify if to write the index words and/or the page numbers as links referring to their corresponding pages in the PDF.
- You can insert a blank page before and/or after the index.
- You can specify the dimensions of the index pages written to your PDF book, and their orientation.
- You can specify whether to write all the word’s page numbers it was found in, or just write the first page number it was found in.
- If you have defined some words as Header words in Step3, then you can specify whether to write their page numbers in the Index or not.
- You can write the number of times each word was found in the book(Count number) or not.
-
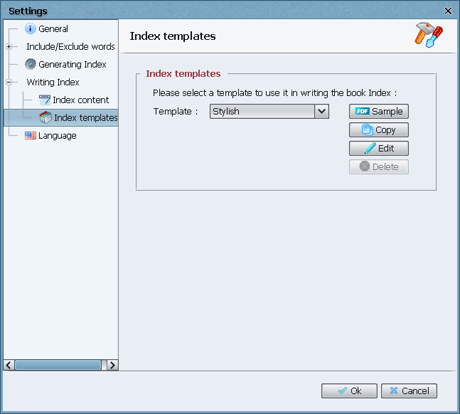
Select template: This will open the Settings dialog on the Index templates tab. Through this tab you can choose a template that suits your book index, or define your own template :
- The program comes with a number of templates, you can choose anyone from them that suits your book. You can click on the Sample button to open an Index PDF sample and see how the template will look like.
- You can select any template from the combo box and click Ok to use it in your Index.
- You can select any template from the combo box and click the Edit button to open the Edit template dialog, wgich will allow you to edit that template.
- You can select any template from the combo box and click the Copy button to make a copy of the selected template, then it will automatically open the Edit template dialog to edit the copied template.
- In the Edit template dialog you can specify :
- The pages background color.
- The index title font(Type, style, size, alignment), foreground color, and background color.
- The index letters(A, B, C, …etc.) font(Type, style, size, alignment), foreground color, and background color.
- The normal words font(Type, style, size), and their foreground color.
- The header words font(Type, style, size), and their foreground color.
- The sub-header words font(Type, style, size), and its foreground color.
- The cross-references title and words’ font(Type, style, size), and their foreground color.
- The page numbers font(Type, style, size), and their foreground color.
-
After specifying all the settings concerning writing the Index, you can now start writing the index to finish the job.

9. Writing the Index entries as links referring to their corresponding pages in the book
-
Index links is a very helpful feature for the book readers. It will help them easily reach the topic
they want to read just by checking the book index. The program allows you to set the index words and/or
their page numbers as links, each link refers to its corresponding page in the PDF.
-
To use this feature you have to enable its options from the program settings. Select :
Tools -> Settings -> Writing Index -> Index content
You can see 2 options here concerning this feature :- Write words as links: This will write each word in the Index as a link referring to
the first page it was found in, in the PDF.
- Write page numbers as links: This will write each page number for all words in the Index as a link referring to its corresponding page in the PDF.
- Write words as links: This will write each word in the Index as a link referring to
the first page it was found in, in the PDF.
-
After enabling one or both of the settings options in the previous point, then when you reach Step4 select a
PDF to append the Index to, then click Start writing. It may take more time to finish writing
your Index, as creating the links is slow. When the process is complete open the final PDF and test
the links in the Index.
-
The links feature will work only when appending the Index to an existing PDF, but not when writing
the Index in a new PDF, as there will be no pages for the links to refer to.

10. Dealing with the book case sensitivity(Small/Capital letters)
-
This is an important topic that many users ask about. In the index results(Step3) you will find the 2 words market and Market
appearing as 2 separate words because one has a small letter and the other has a capital letter. The program is case sensitive by
default, so a word market is not similar to
Market because of the capital letter, but you can force the program to ignore this from the program settings by
selecting Tools -> Settings -> Generating Index and enable the option Ignore case sensitivity of book.
This will make a significant difference, as it will deal with all book words as small letters, which will result both the 2 words market & Market to be considered the same word.
-
If you have defined Include or Exclude categories of words you may also specify to ignore or consider
their case sensitivty while generating the Index from the program settings.

11. Create a custom template
PDF Index Generator comes with a number of nice looking Index templates. In this point we will show
some settings you can edit in any template to have an Index that suits your needs.

-
Change the number of columns to show per page:
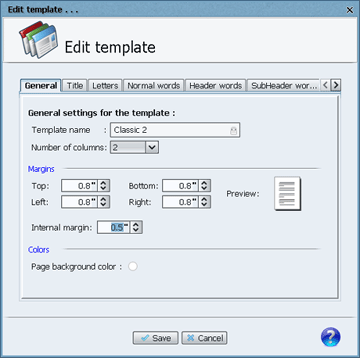
By default you will see 2-Columns per page in your final Index as it is best for book readers, but you can change this to 1-Column or 3-Columns per page if you like, through this :- Click Tools -> Settings -> Index templates.
- Choose any template and click Edit to edit its settings.
- In the General tab you can see the option Number of columns. Change this to the value that suits you, then click Save to save your settings for this template.
-
Edit the Index pages margins:
The distance between the page’s edges and the words inside is editable through this :- Click Tools -> Settings -> Index templates.
- Choose any template and click Edit to edit its settings.
- In the General tab you can edit the margins of the Index pages for this template. You can edit the Top, Bottom, Right, Left, Internal margins.
- Increase or decrease the margins as needed, then click Save to save your settings for this template.
-
Paginate the Book Index:
You can write the page numbers of the Index pages through this :- Click Tools -> Settings -> Index content.
- Enable the option Paginate the book Index.
- Click Advanced to edit the paginator settings.
-
You can edit the following :
-
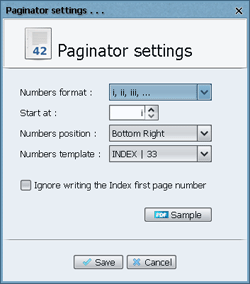
Numbers format: The Numbers format to use. You can select the Arabic numbers, or English letters, or Latin numbers.
-
Start At: Which number to start the paginator with. For example if you have set to start at (13) then the first page in your book
index will have the page number (13) then the next page will be (14), and so on.
- Numbers position: The location in the Index page to write the page number in.
-
Numbers template: The template to use in writing the page numbers. For example if you select (i, ii, iii,…) as a “Numbers format” and
(INDEX | 33) as a “Numbers template”, then the page numbers for the Index paginator will appear like:
INDEX | i
INDEX | ii
INDEX | iii
- Ignore writing the Index first page number: This checkbox specifies if to ignore writing the page number of the first page in the Index. This sometimes is a good idea for a good looking Index,
depending on what Index template you will choose from the Index templates tab. But note that when you enable this option it will still count the first page in your Index,
which means the second page in the Index is still number (2) and will not be considered number (1).
Note : You can click the Sample button to see an Index sample with the selected Paginator settings to see your changes in acton.
-
Numbers format: The Numbers format to use. You can select the Arabic numbers, or English letters, or Latin numbers.
-
Specify Index pages Dimensions and Orientation:
If your book pages have specific dimensions, or if they are Landscape shaped, then you can edit the Index pages to have the same look as your book pages, through this :- Click Tools -> Settings -> Index content.
- Click Index pages setup.
-
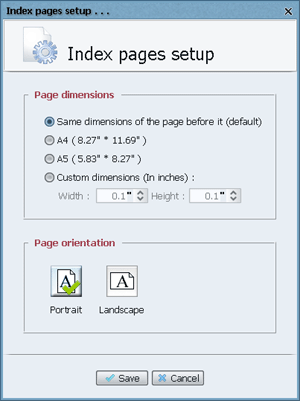
Through the Index pages setup you can :
-
Set the dimensions of the Index pages. By default the program sets the Index pages
dimensions as the same size of the page found
in the PDF book just before the Index itself. You can choose A4 or A5 paper dimensions, or
you can set the dimensions manually. All dimensions are set in Inches.
- Set the orientation of the Index pages in the PDF file.
-
Set the dimensions of the Index pages. By default the program sets the Index pages
dimensions as the same size of the page found
in the PDF book just before the Index itself. You can choose A4 or A5 paper dimensions, or
you can set the dimensions manually. All dimensions are set in Inches.
-
Example:
Now we will show you a sample for a customized Index template. Here is what we did :- We chose the Classic 3 template.
- We chose to write 3-Columns per page for the Index.
-
We edited the selected template to set its margins like this :
- Top margin: 0.8 Inches.
- Bottom margin: 1.0 Inch.
- Left margin: 0.8 Inches.
- Right margin: 0.8 Inches.
- Internal margin: 0.4 Inches.
-
We enabled the Paginator option to paginate the Index pages, and we chose the following settings for it :
- Numbers format: i, ii, iii.
- Start At: i.
- Numbers position: Bottom Center.
- Numbers template: INDEX | 33.
-
We edited the pages dimensions to A4 size.
-
Now the output for all this was :
- We chose the Classic 3 template.

12. Step by step – Indexing a book
We will show you a practical example for how to use PDF Index Generator step by step to index a book
we have. The book is called “Writing your Doctoral dissertation”. Let’s go through this step by step :

-
Review the book, copy all terms and phrases you want to see in the book Index, and paste them in a
text file. You can collect the main words/phrases, then check other words the program will generate later, to
check if you want any of them in the Index. Here are some words and terms we have collected from
our book :
List of collected words . . .support groups
Eisenhart
hoops
independence
doctoral programs
collaboration with professors
stages
terminology
statistical significance
dance
relevant interpretations
data sources
gardening
funding
term papers
logical interpretations
conditional matriculation status
running a marathon
clear interpretations
Ramon Veal Seminar
Chutes and Ladders
topical note cards
libraries
hurdles
National Writing Project
Byzantine maze
self-discipline
qualitative analysis
hypothesis-testing studies
home relationships
quality control
computer technicians
topic selection
university security
dissertation committees
data analysis
starting
terminology.
interpreting findings
reducing data
preliminary organization
procedures
documentation
working environment
cautious interpretations
American Educational Research Association
permanent matriculation status
feasibility studies
external readers
National Council of Teachers of English
professional organizations
journey
personal qualities
writing style
security personnel
New York Times Magazine
dissertation phase
trip
University of Pennsylvania Ethnography Conference
part-time students
birthing event
outside readers
productive mind-set
International Conference on Teacher Research
bibliographic reference cards
dissertation orals
implications
originality
funding proposals
teacher conversation groups
Dissertations Abstract International
mountain climbing
quantitative analysis
Harvard University
train ride
data collection
theory-building
transcribing
American Psychological Association
war
visual displays of information
student-colleagues
terminology..
collaboration..
support groups..
librarians
blind person
dissertation proposal
gate-keeping
data
academic standards
Fahrenthold
game
goal-directed
Rudenstine
marathon
maze
video-tapes
university community
computer technicians
libraries
security
running the rapids
personal crises
doctoral committees
theoretical rationale
construct validity
Ethnologue
inferences
rapids
pilot testing
examination phase
theory-testing
dissertation proposals
research
literature reviews
unpredictability
Some of those collected words/phrases have children(Sub headers) so we wrote them indented, as you can see above. We will handle those in the program.
-
Run PDF Index Generator.
-
Step1 :
-
Browse and select your PDF book.
-
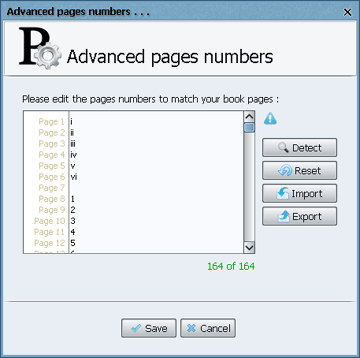
Click on the Advanced page numbers link to specify the page numbers used in the book. Our book is
164 pages, but it starts with a couple of introductary pages(The book cover + Preface +
Acknowledgments + A blank page). Those pages are latin numbered(i, ii, iii, …). Page number (1) in
our book is actually number (7) in the PDF, so we have defined our page numbers as you can see in
the screenshot beside.
-
Since we do not want the program to index the first 7 pages in the book, we will order
the program to exclude them from the indexing process. To do this enable Index
specific pages option, click the Include pages link and specify the ranges of the book pages to index. We have
selected to include the range (8~164) to skip indexing the (7) introductary pages.
-
Before moving to Step2 we will define the list of terms that we have collected in order to command the program to grab them from the book :
- Click Tools -> Settings -> Include/Exclude words -> Include words.
- Click Add Category to add a new Include list.
- Write the categor name, say “Doctoral category”.
- Copy and paste your terms in the Keywords field each in a separate line, i.e :
support groups
Eisenhart
hoops
independence
… etc. - Press Save to save the changes.
-
In addition to the added category of words we want to index any web links that appear in the book to put them in the index … In that case a Query will be very helpful :
- Click Tools -> Settings -> Include/Exclude words -> Include words.
- Click Add Query to define a new Query.
- Write the query name, say “Links query”.
- From the Template combo box select the “Web links” template to load its query in the Query text field, then click Save.
- Press Ok to save the changes.
- Press Next to move to Step2.
-
Browse and select your PDF book.
-
Step2 :
-
Enable the second option Index specific words in the book.
- Click the Include words link. When its dialog appears enable the “Doctoral category” category and the “Links query” query to force indexing
all their words found in the book.Press “Ok” to save.
-
Click the Exclude words link, and enable some of the categories to exclude like Adjectives, Adverbs, … as they are mostly not needed in the Index.
-
Press Ok and before start generating the Index, let’s check the settings of generating the index … Click on Generating index settings label, which will
open the settings dialog on the Generating Index tab. We will just change the default value of the setting Ignore words containing less than … letters
to “3” to ignore such small words, then press Ok to apply settings.
- Click Generate Index to start generating the index from the book. This will take less than 1 minute. When complete press Done to go to Step3.
-
Enable the second option Index specific words in the book.
-
Step3 :
- We have excluded many words, but still the index results table shows 2064 words, that is too many so we will start by disabling the Select/Deselect All checkbox to disable
all results then we will start enabling the words we want from those results.
- Click the Filter button beside the search text field, a list will appear, and choose By include category from that list to filter the table results and show only
the words of the include category that we have created. A small dialog will appear showing the available Include categories to choose one from them. We only have the “Doctoral category”
so we will choose it. Now the table has 115 words, which is our own list.
- Enable the 115 words in the table by enabling the Select/Deselect All checkbox.
- From the Filters menu select Show All to reset the filter and show all the fields again.
-
In the search text field search for www. to search for the web links included from the links Query and enable them too. We have 3 links in our book resulting from this Query.
- We want to write those 3 links in the Index indented under a word “Important links”, so click the Add word button to add a new word manually to the table, with these specifications :
– Word: Important links
– Count: 0
– Pages: 0
– Word type: Header word
Then click Ok to add it to the table.
-
Select the 3 links rows, right click them and select Word type -> Important links … Now those 3 links became Sub-Headers for the header word ” Important links” and they will appear indented under it in the final Index.
-
Reset the search results by clicking the Reset button beside the search text field to show all table words once again.
-
In our list of words that we have grabbed from our book there were some words that we wanted to define as Header words and others as Sub-Headers for them, so we will right click each of those words and specify their words types just like we
did with the links words.
- Press Next to move to Step4.
- We have excluded many words, but still the index results table shows 2064 words, that is too many so we will start by disabling the Select/Deselect All checkbox to disable
all results then we will start enabling the words we want from those results.
-
Step4 :
-
We will append the final Index to our PDF, but first we will check the settings of writing the Index to the book, and choose a suitable template design.
-
Click Writing settings which will open the settings dialog on the Index content tab. We will change the following settings :
- Index title: Appendix
- Enable the option Write page numbers as links to make the pages nmbers in the index refer to their corresponding pages in the PDF.
- Enable the option Write the page numbers of Header words as we want to write the page numbers of Header words in the Index.
- Press Ok to save settings.
-
Click Select template which will open the settings dialog on the Index templates tab. We will select the Artistic template to use it,
then click Ok to save settings.
-
Click Start writing to append the index to the book. This will take a few seconds.
-
A success message will appear. We will save the project in case we wanted to edit it later, then Exit the program.
-
You can check the screenshot beside for a sample from the final Index.
-
We will append the final Index to our PDF, but first we will check the settings of writing the Index to the book, and choose a suitable template design.

13. Indexing a book using font queries
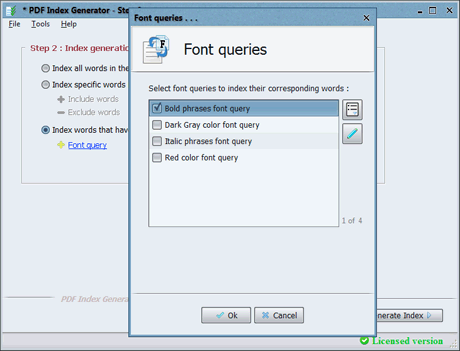
PDF Index Generator allows you to index words or phrases in your book having a specific font format. For example you might want to index only bold or italic text in your book, or text having a specific color. In Step2 of the program you can enable the option “Index words that have specific font format” to use that feature.
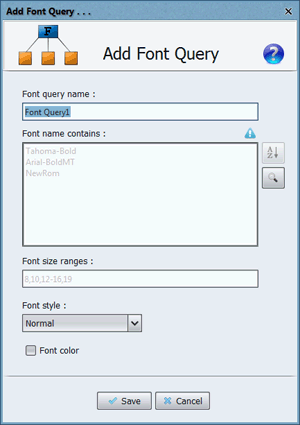
You can define as many font queries as you want. Each font query has one or more font styling specified for it to index only words or phrases having those styling specifications inside the book.
Note : If you will specify more than one option in the “Add font query” window, like setting the font size to ‘12‘ and the font style to ‘bold‘ then it means you want to index all terms in the book that have a ‘12‘ font size, and that are ‘bold‘ at the same time.
If you want to index terms that have a ‘12‘ font size, or terms that are ‘bold‘ then you will have to create a font query for the font size, and another font query for the font style to accomplish this.

14. Using the program in Command Line Mode
Introduction :
How does it work ?
Command Line Parameters :
These are the allowed parameters that you can use in the Command Line Mode :
Example :
Using A Configuration File :
Notes :

- The Command Line feature is an extension for ‘PDF Index Generator’ in order to allow executing the program from the
Command Line, to use 1 command line only or a script file to index 1 or more books without any interaction needed
from the program GUI.
- The main idea is to write a command in the console to execute the program in the background + Pass a number of parameters
to the program to tell it what to do.
- If you double click the program shortcut it will run the program GUI normally where you can use the GUI to index
books normally. If you will write a command line in console, it will run the program in the Console Mode and no GUI will appear.
- The help guide is written for Windows operating system. All the paths here are Windows based, so if you are using another operating system like Mac OS X or Linux, then you will just need to replace the Windows O.S paths with your O.S corresponding paths. All the program commands should work the same on all operating systems.
********
How does it work ?
- Install the program normally. By default the program is installed in C:\Program Files\Pdf Index Generator on Windows O.S.
- Run the Command Line by clicking the
Start Menu -> All Programs -> Accessories -> Command Prompt
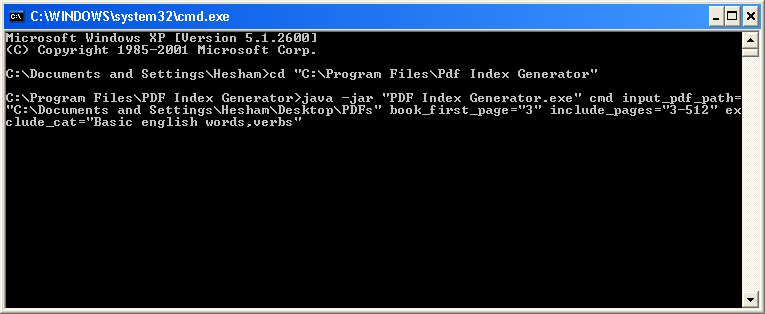
- When the Command Prompt window appears browse to the program installation folder,
i.e. cd “C:\Program Files\Pdf Index Generator”
- Run the program through the command line and pass a number of parameters to it to generate the Index directly, i.e :
java -jar “PDF Index Generator.exe” cmd parameter_1 paremeter_2 paremeter_3
We will explain those parameters in details in the next point, but here is a screenshot sample for the Command Line :
Command Line Screenshot
********
Command Line Parameters :
These are the allowed parameters that you can use in the Command Line Mode :
- cmd:
This is a mandatory parameter. You must write it as the first parameter in order to run the program
in the Command Line Mode. If you did not write this parameter the program will run in GUI Mode.
- input_pdf_path:
This specifies the path of the PDF file you want to index. You can specify a PDF file path or
a folder path containing a number of PDFs to index.i.e :
java -jar “PDF Index Generator.exe” cmd input_pdf_path=”C:\PDFs\1.pdf”
java -jar “PDF Index Generator.exe” cmd input_pdf_path=”C:\PDFs”
- pdf_pages_numbers(Optional, Default = 1,2,3,…):
This specifies the numbers of pages of your book. It is useful if you have Latin page numbers(i, ii, iii, …) or
a mix of Arabic & Latin page numbers, or if you have blank pages. You must write all your book page numbers comma
separated. The output Index will be written using those page numbers for each Index word.
i.e : java -jar “PDF Index Generator.exe” cmd input_pdf_path=”C:\PDFs\1.pdf” pdf_pages_numbers=”i,ii,iii,,1,2,3,4,5,6,7,8,9,10″
The above example means that this book has 14 pages. It starts with 3 latin page numbers, then a blank pages, then 10 Arabic numbered pages.
- include_pages(Optional, Default = “all”):
This specifies what pages do you want to index in your PDF(s). You can specify the page numbers manually, or you can specify
one of the following fixed values: all | even | odd.
- all: This will index all the book pages(Default).
- even: This will index the even pages only of any book.
- odd: This will index the odd pages only of any book.
i.e : java -jar “PDF Index Generator.exe” cmd input_pdf_path=”C:\PDFs\1.pdf” include_pages=”even”
- exclude_pages(Optional):
This specifies what pages do you want to skip from being indexed in your PDF(s).
i.e : java -jar “PDF Index Generator.exe” cmd input_pdf_path=”C:\PDFs\1.pdf” exclude_pages=”12,60-63,82″
Note: You can use include_pages parameter or exclude_pages parameter or both. In case you use both then we will calculate the final pages to index from all the ranges you have specified.
- include_cat(Optional):
This specifies the names of the Include Categories or Queries (Which are defined in the program GUI mode)
to use when generating the index. That will force
the program to search for the words in the specified Include Categories. To use more than one
Include category write a comma separated list of categories names.
Note: If you want to define new Include categories then run the program GUI and define your Include lists through it. You can then use them in the Command Line Mode. Or you can use the include_path_cat parameter.
i.e : java -jar “PDF Index Generator.exe” cmd input_pdf_path=”C:\PDFs\1.pdf” include_cat=”category1,category2,category3″
- exclude_cat(Optional):
This specifies the names of the Exclude Categories or Queries (Which are defined in the program GUI mode)
to use when generating the index. That will force
the program to skip the words in the specified Exclude Categories. To use more than one
Exclude category write a comma separated list of categories names.
Note: If you want to define new Exclude categories then run the program GUI and define your Exclude lists through it. You can then use them in the Command Line Mode. Or you can use the exclude_path_cat parameter.
i.e : java -jar “PDF Index Generator.exe” cmd input_pdf_path=”C:\PDFs\1.pdf” exclude_cat=”Prepositions,Pronouns”
- include_path_cat(Optional):
In addition to using the include_cat parameter, you can also use this parameter to specify 1 or more text
files to force the program to search for their words. You must write each word or phrase in a separate line
in the text file.
You can specify a Text file path or a folder path containing a number of Text files to index their words.
Note: We advise you to use UTF-8 encoded text files to be able to accept non-english characters.
i.e :
java -jar “PDF Index Generator.exe” cmd input_pdf_path=”C:\PDFs\1.pdf” include_path_cat=”C:\Text\include.txt”
java -jar “PDF Index Generator.exe” cmd input_pdf_path=”C:\PDFs\1.pdf” include_path_cat=”C:\Text”
- exclude_path_cat(Optional):
In addition to using the exclude_cat parameter, you can also use this parameter to specify 1 or more text
files to force the program to exclude their words. You must write each word or phrase in a separate line
in the text file.
You can specify a Text file path or a folder path containing a number of Text files to exclude their words.
Note: We advise you to use UTF-8 encoded text files to be able to accept non-english characters.
i.e :
java -jar “PDF Index Generator.exe” cmd input_pdf_path=”C:\PDFs\1.pdf” exclude_path_cat=”C:\Text\exclude.txt”
java -jar “PDF Index Generator.exe” cmd input_pdf_path=”C:\PDFs\1.pdf” exclude_path_cat=”C:\Text”
- index_those_words_only(Optional, Default = “no”):
If you have specified one or more Include categories to index though the include_cat parameter then this parameter will
force indexing the words of those Include categories only, and skip any other words in the book. It has the values “yes” & “no”.
i.e : java -jar “PDF Index Generator.exe” cmd input_pdf_path=”C:\PDFs” include_cat=”category1,category2,category3″ index_those_words_only=”yes”
- include_plurals(Optional, Default = “no”):
If you have specified one or more Include categories to index their words through the include_cat parameter then this parameter
will force index their plural words also if they have plurals. It has the values “yes” & “no”.
i.e : java -jar “PDF Index Generator.exe” cmd input_pdf_path=”C:\PDFs” include_cat=”category1,category2,category3″ include_plurals=”yes”
- exclude_plurals(Optional, Default = “no”):
If you have specified one or more Exclude categories to skip indexing their words through the exclude_cat parameter then this parameter will
force exclude their plural words also. It has the values “yes” & “no”.
i.e : java -jar “PDF Index Generator.exe” cmd input_pdf_path=”C:\PDFs” exclude_cat=”category1,category2″ exclude_plurals=”yes”
- output_append_pdf_path(Optional):
This specifies the path of the PDF file you want to append the index to.You can specify a PDF file path or a folder path.
i.e : java -jar “PDF Index Generator.exe” cmd input_pdf_path=”C:\PDFs\1.pdf” output_append_pdf_path=”C:\PDFs\2.pdf”
If the specifed append PDF file does not exist, or the specified folder path does not exist, then the append process will fail.
Note: If you have defined a folder of PDFs to index through the parameter input_pdf_path then you must define a folder path here too that contains PDF files with the same names of the input files so that the index will be appended to them.
i.e : java -jar “PDF Index Generator.exe” cmd input_pdf_path=”C:\PDFs” output_append_pdf_path=”C:\PDFs_append_output”
- output_new_pdf_path(Optional):
This specifies the path and name of the new PDF file you want to write the index to.You can specify a PDF file path or a folder path.
i.e : java -jar “PDF Index Generator.exe” cmd input_pdf_path=”C:\PDFs\1.pdf” output_new_pdf_path=”C:\PDFs\1_index.pdf”
Note: If you have defined a folder of PDFs to index through the parameter input_pdf_path then you must define a folder path here too.
i.e : java -jar “PDF Index Generator.exe” cmd input_pdf_path=”C:\PDFs” output_new_pdf_path=”C:\PDFs_new_output”
- output_new_text_path(Optional):
This specifies the path and name of the new Text file you want to write the index to.You can specify a Text file path or a folder path.
i.e : java -jar “PDF Index Generator.exe” cmd input_pdf_path=”C:\PDFs\1.pdf” output_new_text_path=”C:\Text\1_index.txt”
Note: If you have defined a folder of PDFs to index through the parameter input_pdf_path then you must define a folder path here too.
i.e : java -jar “PDF Index Generator.exe” cmd input_pdf_path=”C:\PDFs” output_new_text_path=”C:\Text”
- group_pages_numbers(Optional, Default = “yes”):
This parameter is very useful if a word is found in many pages in the book, so for example if the word “Budget” is found in
pages 1, 2, 3, 4, 5, 6, 18, 101, 102, 103, 104, 105, then instead of showing all those page numbers, they will appear in
ranges, like 1-6, 18, 101-105 which is much easier to read. These grouped ranges will be written like this in the book index.
This parameter has the values “yes” & “no”.
i.e : java -jar “PDF Index Generator.exe” cmd input_pdf_path=”C:\PDFs” group_pages_numbers=”yes”
- index_title(Optional, Default = “Index”):
Use this parameter to specify the title of the Index written at the top of the first page.
i.e : java -jar “PDF Index Generator.exe” cmd input_pdf_path=”C:\PDFs” index_title=”Appendix”
- write_index_after_page(Optional, Default = “0”):
This parameter will specify after which page do you want to write the index in your PDF book. If the value is 0 then the Index will be written after the last page in the book.
i.e : java -jar “PDF Index Generator.exe” cmd input_pdf_path=”C:\PDFs” write_index_after_page=”511″
- write_index_before_last_page_by(Optional, Default = “0”):
This parameter will specify how many pages to write the index before from the end of book. This is very useful
if you are indexing a folder containing a number of PDFs, where the number of pages for each PDF is different
than the others, so it becomes hard to use the write_index_after_page parameter.
Note: If you used the write_index_after_page parameter, then this parameter will be ignored.
i.e : java -jar “PDF Index Generator.exe” cmd input_pdf_path=”C:\PDFs” write_index_before_last_page_by=”2″
- paginate_index(Optional, Default = “yes”):
This parameter will allow you to write the page numbers of the Index pages which are added to your book. We call this “A paginator”.
i.e : java -jar “PDF Index Generator.exe” cmd input_pdf_path=”C:\PDFs” paginate_index=”no”
Note: If you would like to change the settings of the paginator then run the program GUI and change the paginator settings from the program settings. The changes you make will take effect in the Command Line Mode.
- write_words_as_links(Optional, Default = “yes”):
This parameter will write the index words as links. If a word is clicked then it will go to the first page it was found in.
This parameter has the values “yes” & “no”.
Note: This option will take effect only when appending index to an existing PDF(To find pages to link to).
i.e : java -jar “PDF Index Generator.exe” cmd input_pdf_path=”C:\PDFs” write_words_as_links=”yes”
- write_pages_as_links(Optional, Default = “no”):
This parameter will write the page numbers of each word as links. If a page number is clicked then it will go to its corresponding page in the book.
This parameter has the values “yes” & “no”.
Note: This option will take effect only when appending index to an existing PDF(To find pages to link to).
i.e : java -jar “PDF Index Generator.exe” cmd input_pdf_path=”C:\PDFs” write_pages_as_links=”yes”
- insert_blank_before_index(Optional, Default = “no”):
This parameter will insert an empty page before writing the Index(This applies only when appending the Index to an existing PDF book).
This parameter has the values “yes” & “no”.
i.e : java -jar “PDF Index Generator.exe” cmd input_pdf_path=”C:\PDFs” insert_blank_before_index=”yes”
- insert_blank_after_index(Optional, Default = “no”):
This parameter will insert an empty page after writing the Index(This applies only when appending the Index to an existing PDF book).
This parameter has the values “yes” & “no”.
i.e : java -jar “PDF Index Generator.exe” cmd input_pdf_path=”C:\PDFs” insert_blank_after_index=”yes”
- write_first_page_only(Optional, Default = “no”):
By default the program will write all page numbers each word was found in. This parameter will allow you to write the first page
number only each word was found in, in the index. This parameter has the values “yes” & “no”.
i.e : java -jar “PDF Index Generator.exe” cmd input_pdf_path=”C:\PDFs” write_first_page_only=”yes”
- write_header_words_pages(Optional, Default = “no”):
If you have specified some words in Step3 as “Header words”, by default their page numbers are not written in the Index as they are considered as
titles only, but you can use this option to write their page numbers. This parameter has the values “yes” & “no”.
i.e : java -jar “PDF Index Generator.exe” cmd input_pdf_path=”C:\PDFs” write_header_words_pages=”yes”
- write_words_count(Optional, Default = “no”):
By using this parameter, the number of times each word was found in the book will be written in the Index. It will appear in brackets.
e.g : bicycle[6], 15, 22, 101, 316
This parameter has the values “yes” & “no”.
i.e : java -jar “PDF Index Generator.exe” cmd input_pdf_path=”C:\PDFs” write_words_count=”yes”
- write_comma_after_word(Optional, Default = “yes”):
This parameter will write a comma in the Index between the word and its page numbers.
e.g : Farm items, 20, 137
If you set this parameter to “no” then the comma between the word and the page numbers will be omitted.
e.g : Farm items 20, 137
This parameter has the values “yes” & “no”.
i.e : java -jar “PDF Index Generator.exe” cmd input_pdf_path=”C:\PDFs” write_comma_after_word=”yes”
- template_name(Optional, Default = “Stylish”):
This specifies the name of the template to use when writing the index to the output PDF.
i.e : java -jar “PDF Index Generator.exe” cmd input_pdf_path=”C:\PDFs\1.pdf” template_name=”Artistic”
- print_index_report(Optional, Default = “no”):
By using this parameter a detailed report will be printed in the Console for each indexed book. It will print :
- The count of the index pages added to the book (If blank pages are added before or after the index, they will also by counted).
- The number of indexed pages.
- The number of pages that failed to be indexed.
- The number of indexed words.
- The number of words that were not found in the book.
i.e : java -jar “PDF Index Generator.exe” cmd input_pdf_path=”C:\PDFs” print_index_report=”yes”
********
Example :
- We will index a folder containing a number of PDF books.
- We will index only the odd pages of all books in the folder.
- We will specify a number of Exclude Categories to exclude.
- We will use the “Stylish” template.
- Here is the command line we will use :
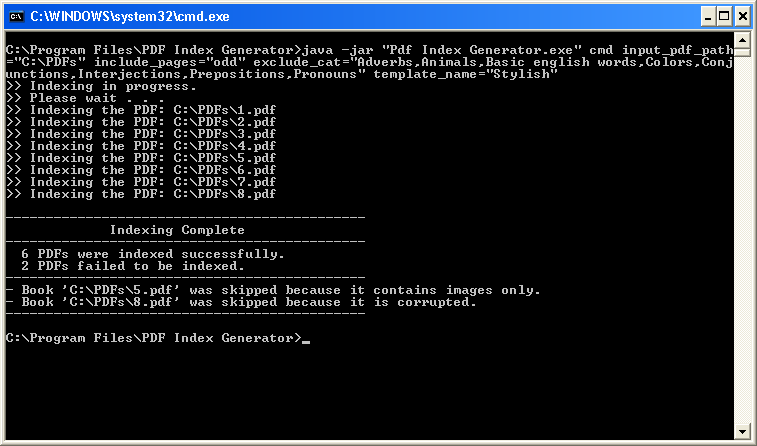
java -jar “PDF Index Generator.exe” cmd input_pdf_path=”C:\PDFs” include_pages=”odd” exclude_cat=”Adverbs,Animals,Basic english words,Colors,Conjunctions,Interjections,Prepositions,Pronouns” template_name=”Stylish”
- What the program will do here is that it will :
- Read every book in the specified folder and validate it(Check it is not Corrupted).
- Calculate the final pages to index.
- Generate the Index, excluding all the word in the specified Exclude lists.
- Append each generated index to its corresponding PDF using the Stylish template.
-
Print the final Index report in the Command Line. i.e :
Command Line Indexing Report
- Read every book in the specified folder and validate it(Check it is not Corrupted).
********
Using A Configuration File :
-
To make things easy for you, you can create a Configuration File, write all the parameters you like
in it and pass that file as a parmeter in the console instead of writing many parameters in the console directly.
That will be very useful if you want to save your parameters to use them any time later.
-
Configuration File Specifications :
- It must be a text file.
- Write each parameter and its value in a separate line.
- You can use any of the parameters that you use in the program console, except the “cmd” parameter, as this parameter must only be used in the Console Mode.
-
You must define the path of the Configuration File in the console through the parameter “config_file_path“.
i.e : java -jar “PDF Index Generator.exe” cmd config_file_path=”C:\config.txt”
-
You can still write the parameters in the console even if you will use the configuration file parameter.
i.e : java -jar “PDF Index Generator.exe” cmd template_name=”Artistic” config_file_path=”C:\config.txt”
Note: In the above example if the configuration file has a parameter template_name=”Business” which means this parameter exists in both the console and in the configuration file, then the console parameter will overwrite the paramter that exists in the configuration file, which means the program will use the “Artistic” template.
-
Example :
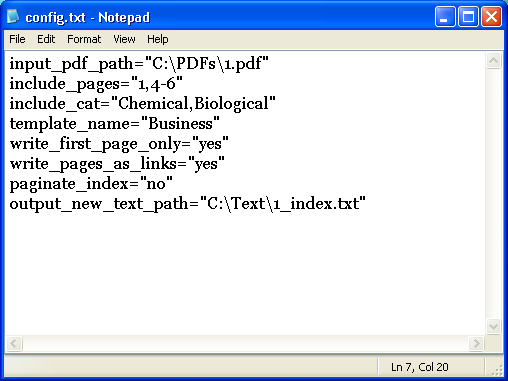
- We will create a configuration text file with the parameters as in the screensshot below.
-
We will write this command in the Command Line to execute the index :
java -jar “PDF Index Generator.exe” cmd config_file_path=”C:\config.txt”
Configuration File Screenshot
- What the program will do here is that it will :
- Open the configuration file, and read all the parameters inside it.
- Read the PDF book and validat it.
- Calculate the final pages to index.
- Generate the Index, including all the words in the specified Include lists.
- Write the generated index to the new specified text file path, using the Business template and the specified writing settings in the configuration file.
- Print the final Index report in the Command Line.
********
Notes :
-
To make the program performance faster you can pass the parameter “-Xmx” in the command line, so the program will run with high memory allocated. i.e :
java -Xmx1024m -jar “PDF Index Generator.jar” cmd parameter_1 paremeter_2 paremeter_3
-
If you did not use any of the output parameters: output_append_pdf_path or output_new_pdf_path or output_new_text_path so
you did not specify where to write the output index then by default the output index will be appended to the same input PDF file that you have
specified in the parameter input_pdf_path.
-
Some of the program settings can be changed only through the GUI Mode as they are not used a lot and changing them through the Command Line would make them complicated,
so instead you can run the program GUI, change those settings as you like, save your settings and close the program GUI. When you run the program through the Command
Line Mode those settings will take effect.
Those settings are like :
- The dimensions of your Index pages.
- The fonts used for writing the Index(Changing the template settings).
- The Paginator settings.
- The Index margins dimensions.
********


